
PFS Slim Ornate Banner┃Inspiration Card
Happy Monday, friends! I hope you are getting a great start off this week, today I’d like to share with you this “Sending Comfort for Today, Hope for Tomorrow” card that I made using the Slim Ornate Banner Die Set by Pinkfresh Studio. By the way, this card is part of the fabulous Instagram Hop that is happening right now on Instagram. In case you want to hop along with us, I’ll be adding a link below so, you won’t miss a chance to win one of the many fabulous prizes. That being said, let’s jump to the step by step on how I made this card ↓

To begin with, I started by creating the card base out heavy weight white cardstock. To do that, I trimmed down with the paper trimmer an 8’’ x11’’inches cardstock sheet to H 8-5/8’’x W 7-1/4’’inches then, I transfer the cardstock to my scoring board, and I scored a line at 3-5/8’’inch mark. Once the scoring line was done, I folded the card base in half, and I reinforced the fold with my Teflon bone folder then, I set it aside.

Meanwhile, to create the card panel layering for the card, I ran through my Platinum 6 Die Cutting and Embossing Machine 1 out of the 2 Tim Pail color card panels along with the largest die from the Slim Ornate Banner Set. Then, I ran through the die-cutting machine the second-to-last die from the set along with the second card panel. Lastly, I ran through the die-cutting machine the smaller die from the set to die-cut it out of white cardstock.

Right after when all 3 die-cutting pieces for the card panel layering were finished, I mounted the largest panel with craft foam and double-sided tape to the card base then, I adhered down the second card panel layer with double-sided tape over the first layer. Lastly, I mounted the white layer with craft foam and double-sided tape adding that way lots of dimension in between layers.

After finishing the layering for the card panel I set it aside and I started the heat embossing for the focal point. So therefore, I placed inside my stamping tool a large Strathmore 400 Series Watercolor panel and I added lots Embossing Powder Tool over it. Then, I stampeded the Floral Cluster and their Stems, as well as the tied bow, Sending sentiment and a sub-sentimet over the card panel with Embossing Ink. Lastly, after the stamping, I removed the card panel and I covered the stamping with WOW! Metallic Gold Rich and I finished the heat embossing with my Heat Embossing Gun Tool.
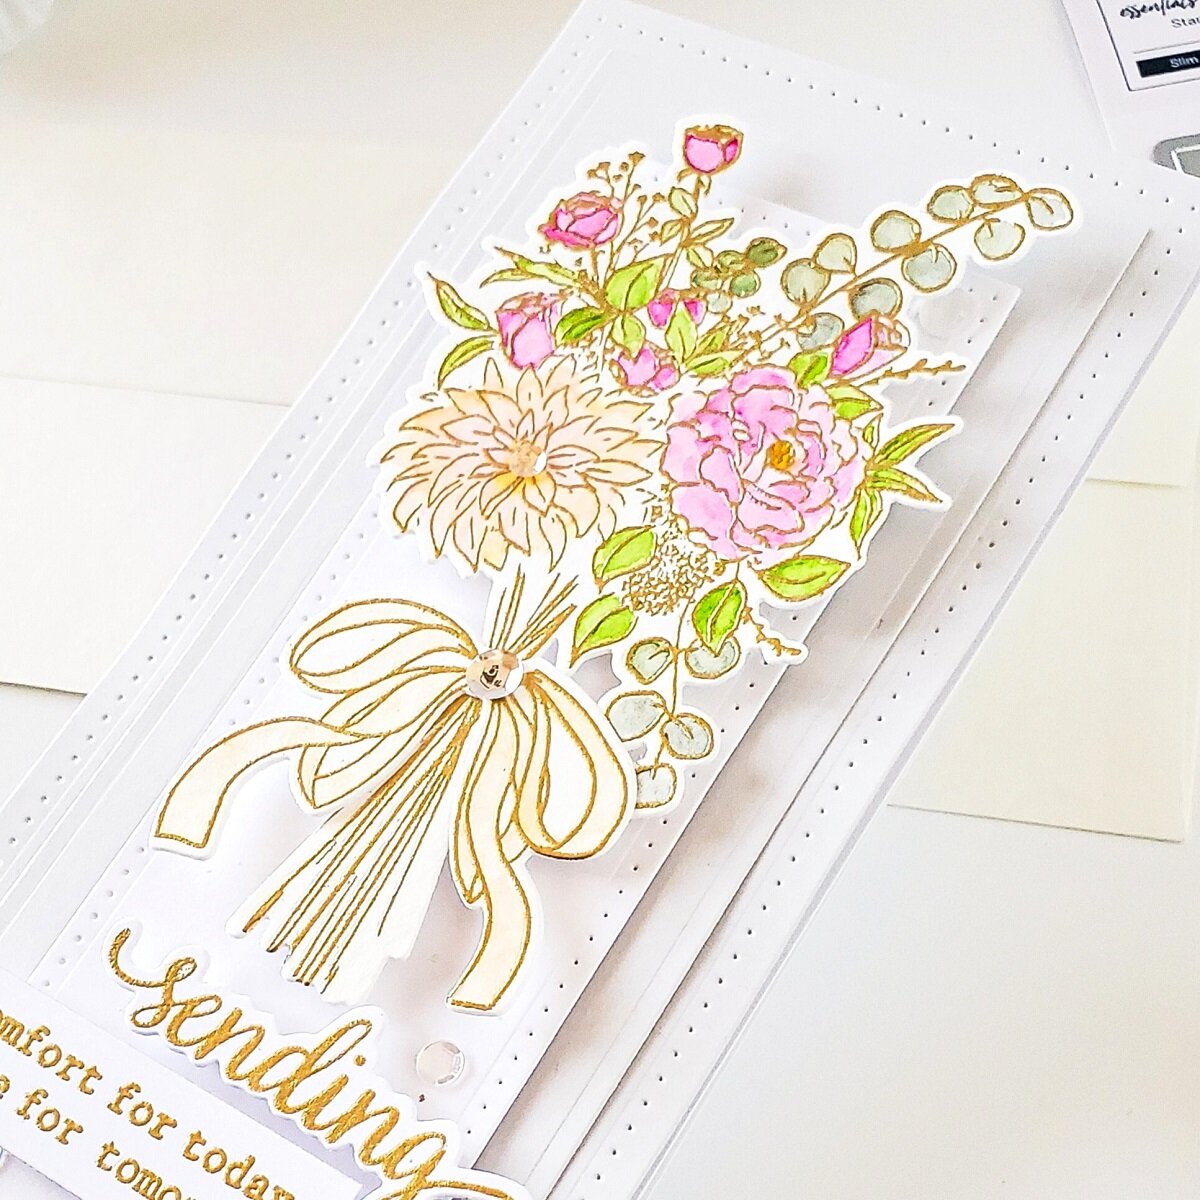
To add a pop of color, I made a loosely watercolor wash over the floral cluster with Pink, Blush, Mint and Gold hues.

So, after my water-coloring was completely dry, I ran through the die-cutting machine the card panel along with the coordinated dies to die-cut the Floral Cluster, Sending and Tied Bow out of the panel. By the way, for this card I used Floral Vase Stamp and Floral Vase Die sets. Finally, after all die-cutting pieces were done, I mounted the floral and the sending with foam squares adhesive (as shown above) as well as the sub-sentiment which I trimmed down on a strip form. As for the tied bow, I glued down with liquid glue and to finish it off, I also glued down here and there with liquid glue a few of my Crystal Mix for and extra touch of shine.

With that being said, I hope you’ve enjoyed reading the step by step on how I’ve created today’s “Sending Comfort for Today, Hope for Tomorrow” card using the Slim Ornate Banner Die Set by Pinkfresh Studio. As I mentioned at the beginning of the blog this card is part of the fabulous Instagram Hop so, if you want to hop along CLICK HERE → Pinkfresh Instagram for a chance to win; 1 Grand Prize $250.00 from the Pinkfresh Instagram Post or 1out 6 $60.00 Gift Cards from the other posts. Isn’t that awesome!!?? But before you go, I hope this card inspires you to give it a try! As always, I appreciate the time that takes you to read my blog posts. Below, you’ll find the supply list for the products used on today’s blog post. If, you get inspired by today’s project be sure to tag me on Instagram➝@cardsandcraftsbyyaz , I’d love to see what you create.
Thank you and happy crafting, your time is valuable.
Don't forget to keep spreading kindness, Today and Always.
Love,
Yasmin
Supply List
Slim Ornate Banner Set
Floral Vase Stamp Set
Floral Vase Die Set
Tim Pail Cardstock
Crystal Mix
WOW! Metallic Gold Rich
WOW! Embossing Ink Pad
WOW! Embossing Ink Pad Refill
WOW! Heat Embossing Gun Tool
Inkadinkado Embossing Powder Tool
Strathmore 400 Series Watercolor Paper Pad
Platinum 6 Die Cutting and Embossing Machine
Cougar 110# Heavy Weight Card Stock

PLEASE NOTE
As part of the WOW! Designer Team, WOW! has provided me a code for all my lovely Subscribers to use. So, don’t forget to take the advantage of a crafty 10% off all purchase for both WOW!
US and UK by simply by using my code: WOWDTYD
Here are the links for both websites weather you’re a US or UK user.
WOW! Embossing Powder US
WOW! Embossing Powder UK
Your imagination is Your limit.
All photography provided by Yasmin Diaz


Creativity is contagious, pass it on.
–Albert Einstein
Disclosure
I am creating this blog post with the purpose of sharing how I design my cards, the information provided here is base in my own opinion and creativity. I am not an expert by any means, and I only share the way that I design my cards. Most of the products used for my blog posts are personally purchased by me. However, I did receive the Pinkfresh Studio and WOW! Embossing Powder products. Please, keep in mind that, all referral links are added for you to know from where either, I purchase or receive the items from as, all products shared and mentioned in each of my blog posts are simply because I use, and truly love them.