
Happy Monday, Friends! On today’s blog, I’m back again sharing this fun and dimensional, but quick and easy at the same time “Sweet Treats on Valentine’s Day” inspiration project made using a full array of products by The Stamp Market. So, without further ado let’s jump right into the step-by-step for how I made it ↓

Although, this project has a Valentine’s Day look it could be fun to use it for an any occasion handmade gift projects. Therefore, I’d like to start by sharing with you the full details for how I made this gift bag. So, to do it, I used one sheet from Hammermill Cardstock 100 lb - 100 Bright 17x11 inches cardstock and then, I placed it over my Scoring Board to trace some scoring lines using the standard Teflon bone folder including in Craft Treat Teflon Bone Folder at the 1/2”. 3.0”, 9-1/2”, 12.0” and 12-1/2” inches. Next, I went ahead to trim down the excess from the end using a Rotary Cutter and a metal ruler. Once, I had that step done, I’ve gone ahead to mark a scoring line to the bottom part of it at the 2-1/2”inches mark.

The cardstock sheet wasn’t larger enough to close the gift bag so, I went ahead to trim down a smaller cardstock piece at W 6-1/2” x H 11.0” inches. Next, I added a scoring line to the bottom part of the cardstock piece at 2-1/2” inches mark and once I had it that done, I proceeded to close the gift bag by folding the scoring lines over and by getting the edges from the large piece of the gift bag adhered to the back of the smaller piece. Then to finish it off, I went ahead to get the bottom of the gift bag adhered to the other creating that way a finished gift bag with the following dimensions: H 8-1/2 x W 6-1/2 and 8-1/2 x 2-1/2” inches depth.

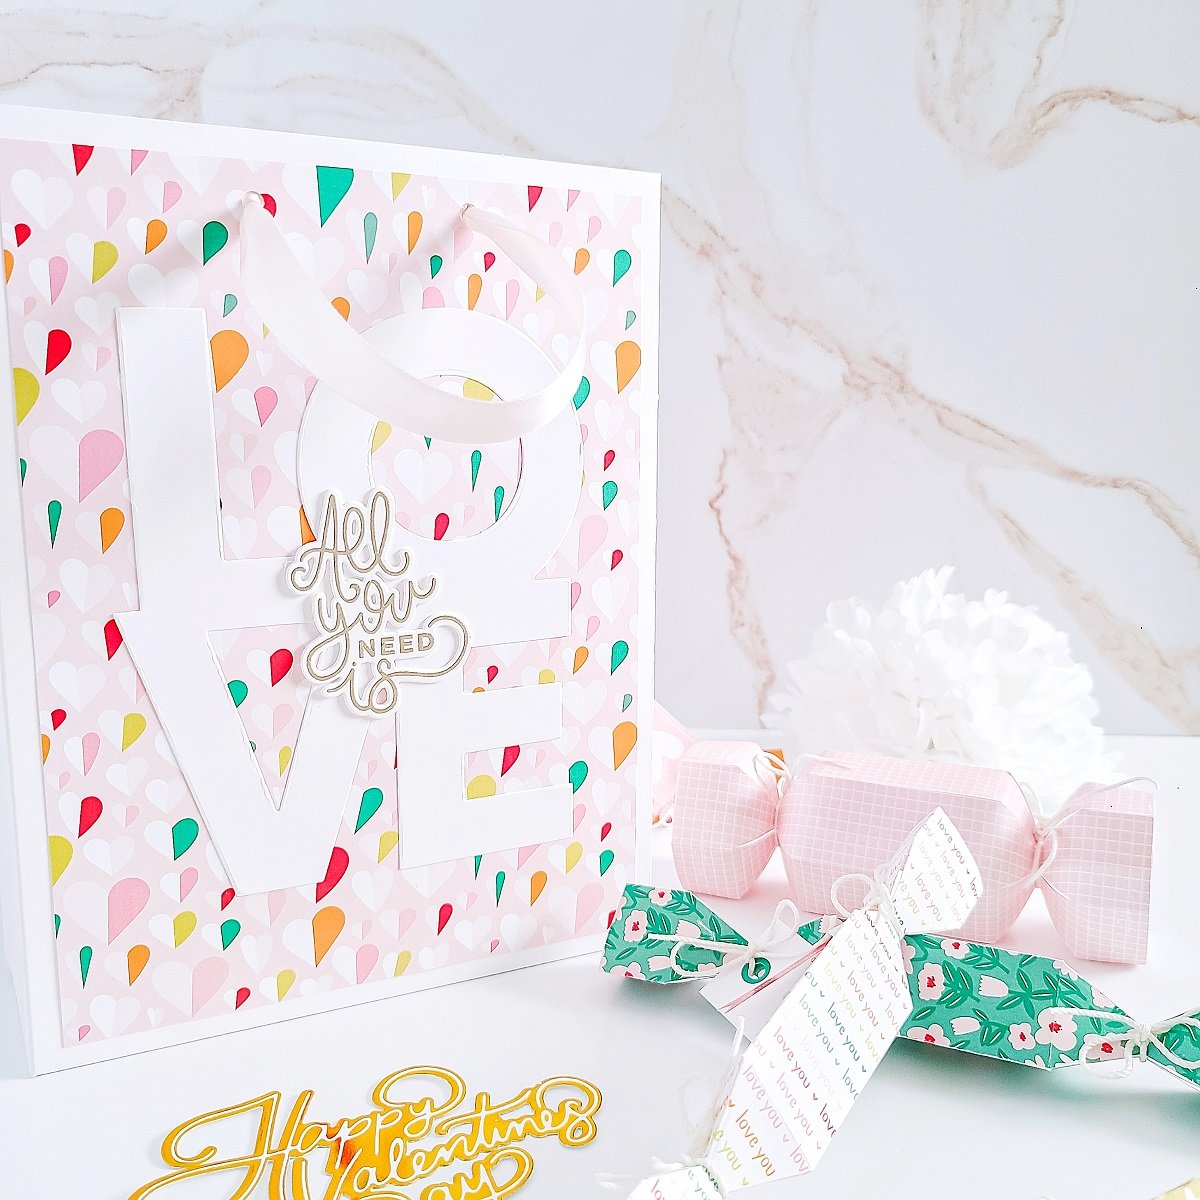
Moving on, after getting the gift bag finished, I went ahead to use 2-patterned papers with the same design from the Little Love 6X8 Patterned Paper Pad and then, I’ve got them adhered to the front and back of the gift bag. Because there isn’t a gift bag without its handles, I went ahead to use a small whole puncher to open two holes in the front and back of the bag at 2-1/4” inches from each side leaving 1/2 of an inch from the top side of it. Thus, for the handles, I use a light pink satin ribbon with 1/2 of an inch width. Finally, to get the front of it embellished, I used Love Die Cover to cut out the love word from white cardstock and then, I’ve got it adhered to the front of it. next, I used the sentiment and coordinating die including in Love & Flowers Stamp and Love & Flowers Dies to stamp and cut out the All You Need Is sentiment for a completed look.

Right after that, I’ve had finished the embellishments for the gift bag, I went ahead to put it off to the side to create the sweet treats. So, to do that, I used some of the patterned paper sheets from the pad along with Gift Cracker Die to create the 3D-mentional candy looking treats. This die it’s so much fun ad it creates the scoring lines which make it easy to follow when putting together the paper candies. Having that said, I went ahead to cut them out from the patterned paper sheets and then, I’ve got them adhered and, I also added the small tags to them along with pieces of bakery twine which, I’ve got it tied up with a bow on each end as, you can see in the image above. By the way, the tags are from one of the patterned paper sheets from the pad.

This die,could be used to make a bigger paper candy by doubling it up. Thus, I went ahead to die cut twice the design from two patterned paper sheets with the same design and then, I went ahead to put them together achieving that way a bigger size paper candy which it’s the perfect size to get it fill up with small chocolates.
And, with that being said friends, I hope that you’ve enjoyed reading the step-by-step for how I’ve made this fun and dimensional, but quick and easy at the same time “Sweet Treats on Valentine’s Day” inspiration project using products by The Stamp Market. As always, I appreciate the time that takes you to read my blog posts. Below, you’ll find the supply list for the products used on today’s blog post. And… If, you get inspired by today’s projects be sure to tag me on Instagram ➝@cardsandcraftsbyyaz, I’d love to see what you’re creating.
Thank you and happy crafting.
Stay Awesome & Beautiful
— Today & Always —
Love,
Yasmin
Supply List
Love Die Cover
Gift Cracker Die
Love & Flowers Stamp
Love & Flowers Dies
Little Love 6X8 Patterned Paper Pad
Tool ‘n One
Bearly Art Precision Craft Glue
Platinum 6 Die Cutting and Embossing Machine
Scoring Board
Comfort Paper Trimmer
Craft Treat Teflon Bone Folder
Rotary Cutter
Hammermill Cardstock 100 lb - 100 Bright 17x11
Hammermill Cardstock 80lb - 100 Bright 17x11
Crafter's Essential Cutting and Alignment Mat
Your imagination is Your limit.
All photography provided by Yasmin Diaz


Be sure to follow me on Instagram for more as I share fun mini tutorial for how I made the cards in my reel section there!
Creativity is contagious, pass it on.
–Albert Einstein
Disclosure
I am creating this blog post with the purpose of sharing how I design my cards, the information provided here is base in my own opinion and creativity. I am not an expert by any means, and I only share the way that I design my cards. Most of the products used for my blog posts are personally purchased by me. However, I did receive the products by The Stamp Market.
Please, keep in mind that, all referral links are added for you to know from where either, I purchase or receive the items from as, all products shared and mentioned in each of my blog posts are simply because I use and genuinely love them.
However, I’d like to mention that links from Altenew, Pinkfresh, Pigment Craft Co, Scrapbook.com, Waffle Flower Crafts and Spellbinders are affiliated links which means that I get paid a small commission when a purchase is made thru that particular link at no additional cost to you.
Also, I am not paid by any company to promote their products, nor any company sponsors my blog. I pay for my own website, I take my photography, I personally type my blog post, I enter links and even better I make every single card. I try my best working every day a little bit here and a little bit there striving for a professional and friendly use to you. With that said, your support is so much appreciated as if you use those links your help will help me to keep this website running.
Thank you and have a wonderful crafty-shopping!