
Spellbinders ‘Marvelous Mermaids Collection by Jane Davenport┃Inspiration Cards
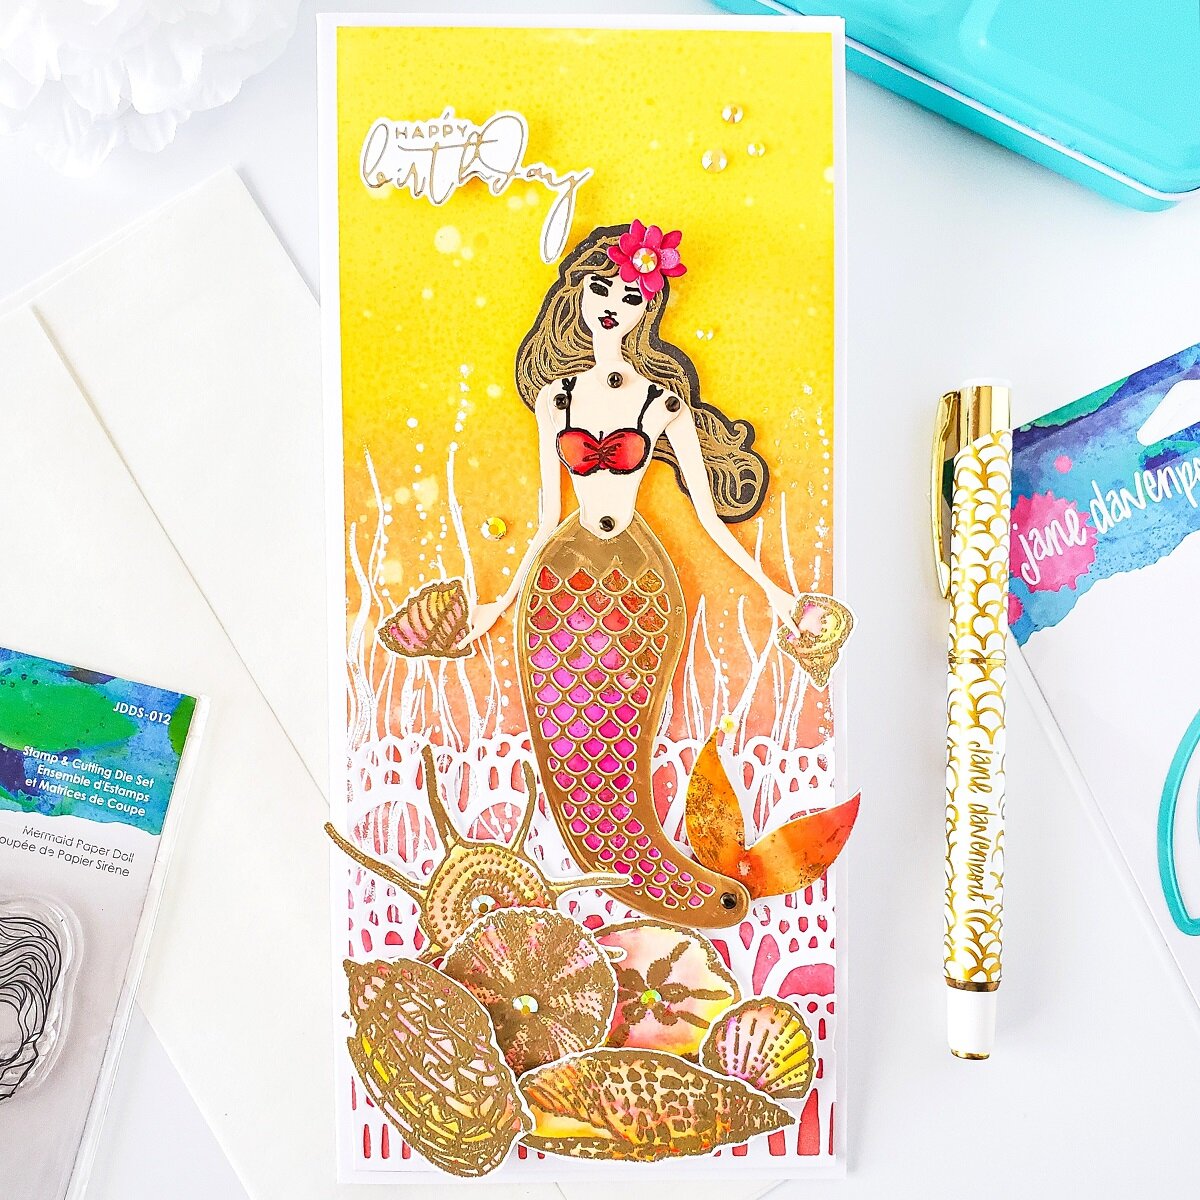
Hello, Friends! Yasmin here sharing with you 2 out of 3 “Ocean Theme” cards that, I’ve created showcasing stamps and die sets from the Marvelous Mermaids Collection by Jane Davenport by Spellbinders. By the way, I was up on Spellbinders ‘Blog yesterday showcasing a slimline “Birthday Mermaid” card created with this gorgeous collection too. So, in case you want to check it out…I’ll be adding a direct link and pictures below. With that said, let’s jump into the step by step on how I’ve made them ↓
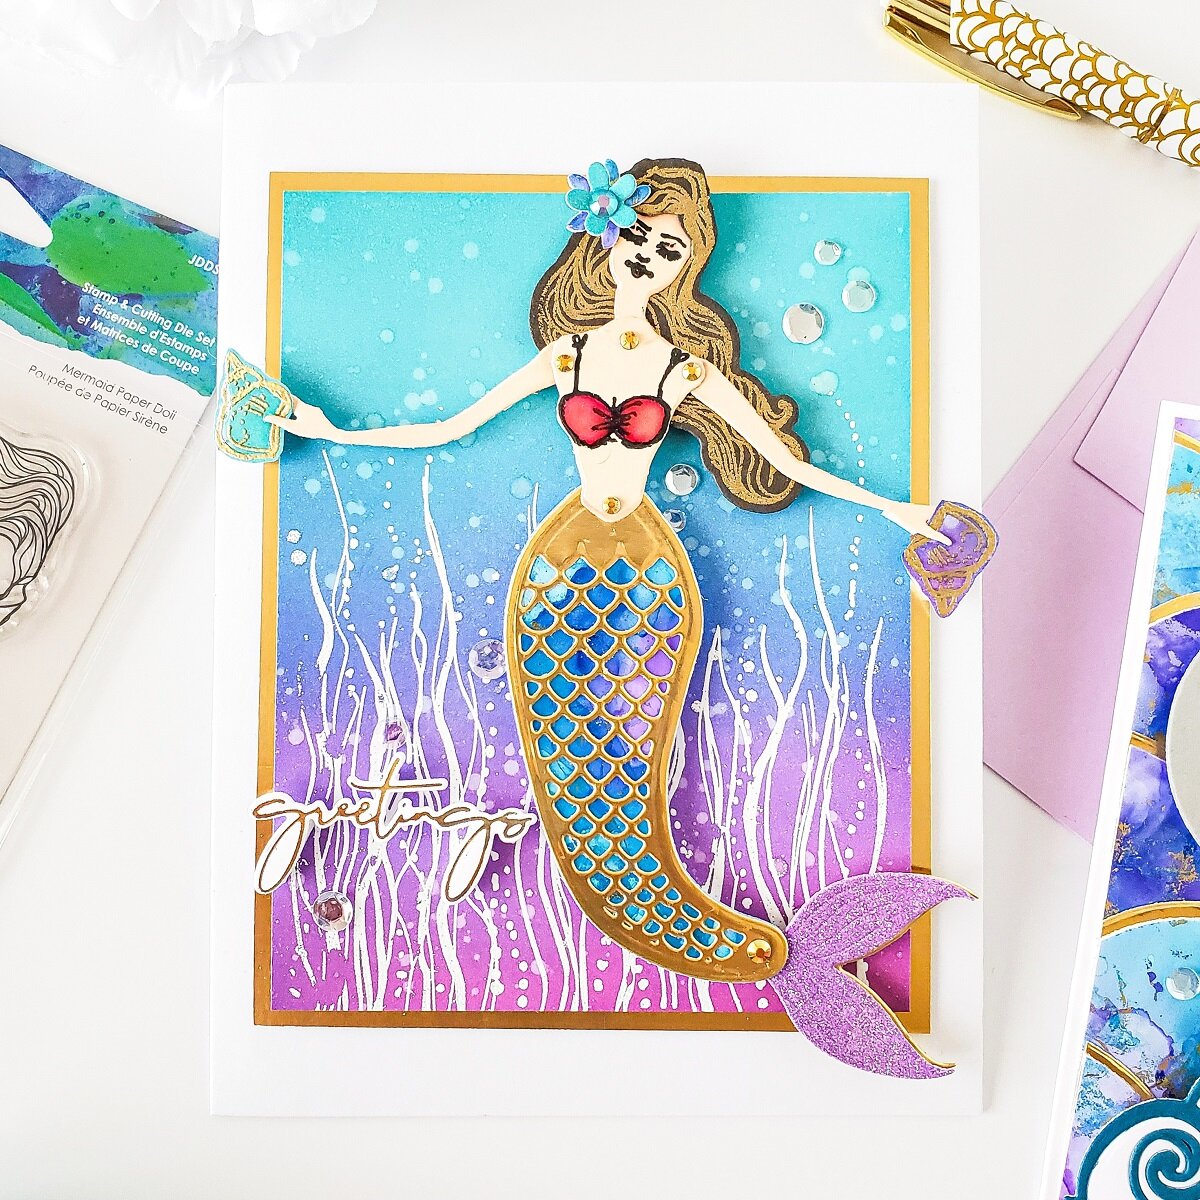
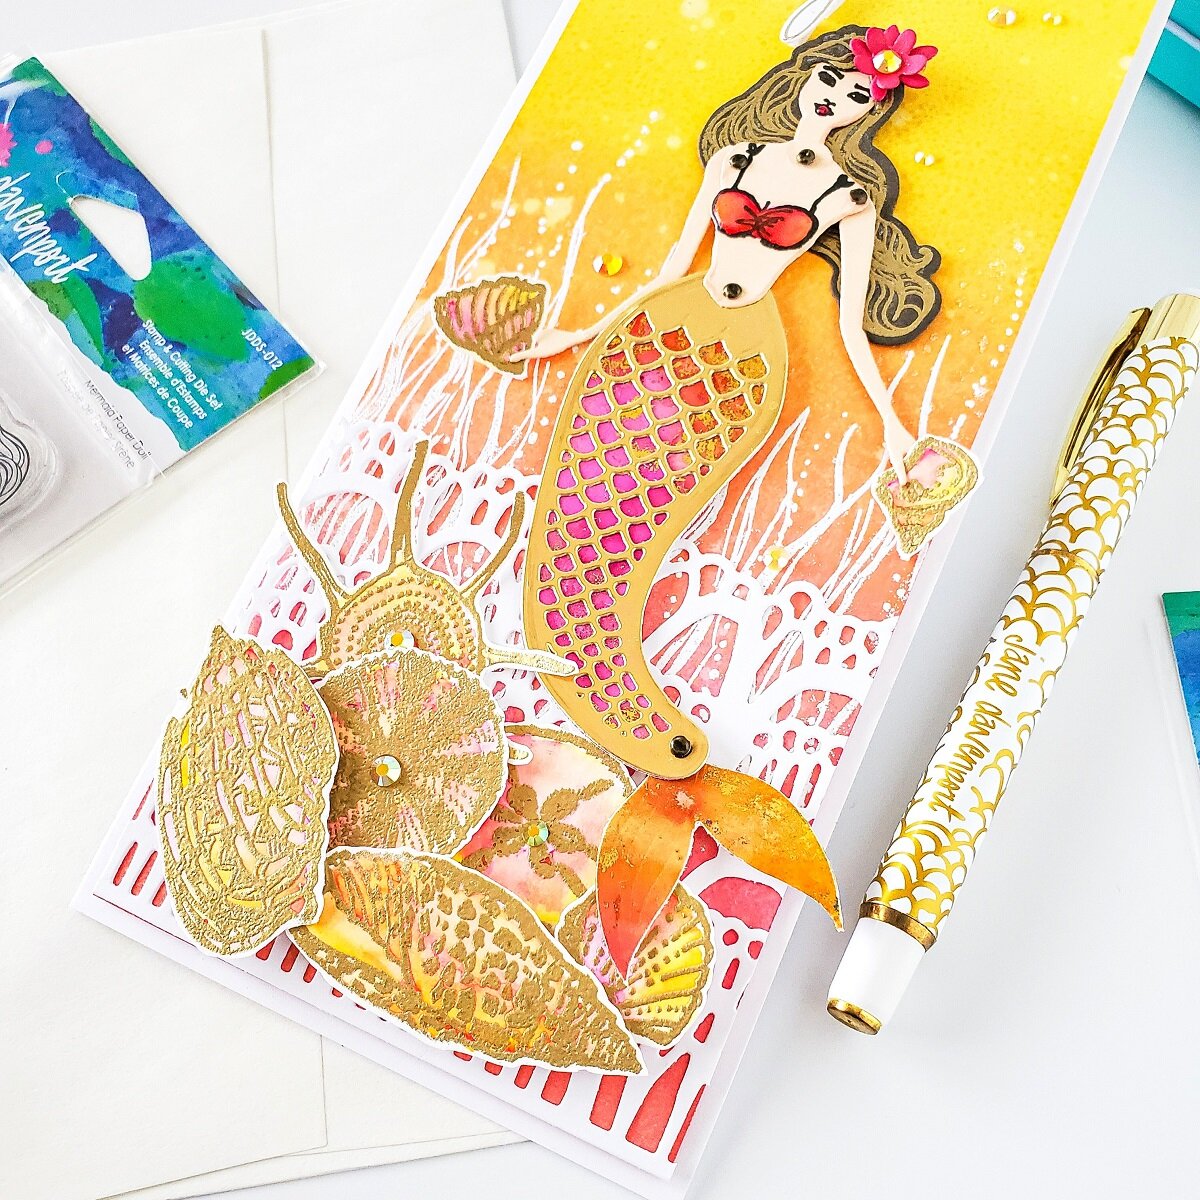
To begin with, I started by ink blending a Strathmore 300 Series Smooth Bristol card panel with the following Distress Oxide Inks; Peacock Feathers, Mermaid Lagoon, Wilted Violet and Seedless Preserves. Once, I had the ink blending done, I used my Distress Spray bottle to create droplets to active the oxide effect. So, after removing the excess of the water droplets with a paper towel, I sprayed the entire card panel with Sheer Shimmer Spritz Spray-Sparkle to add a touch of sheen to it. Then right after, I set the card panel aside to dry.

Meanwhile, I started the die-cutting process. For the die-cutting, I used the Mermaid Paper Doll Stamp and Die Set Marvelous Mermaids by Jane Davenport. Therefore, I ran through my Platinum 6 Die Cutting and Embossing Machine the; Head, Torso, Left Arm and Right Arm to die-cut them out of Warm Glow color cardstock. Then, I ran through the die-cutting machine the Tail Outline to die-cut it out from Gold cardstock. Followed by the Tail Insert to die-cut it out from an alcohol ink blended with foil accents that I had in my stash. By the way... the ink blending color combination was exactly the same however, in Alcohol Pearl Ink form. Lastly, I ran through the die-cutting machine the Tail Fin die to die-cut it out 1X from a glittery Purple heat embossing cardstock and 1X out of gold cardstock as well as the Hair die to die-cut it out from Charcoal Brown color cardstock.

Therefore, after I was done with all die-cutting pieces, I started the assembling for the Mermaid Paper Doll. So, to that first, I glued down with liquid glue the gold Tail Outline over the Tail Insert. Second, I stampeded with Black Ink over the Torso the Bikini Top as well as the Closed Eyes expression over her Face. Fourth, I stacked the Purple Glittery Tail Fin slightly offset over the Gold Tail Fin to have a bit of gold shadowing. Fifth, I Gold heat embossed the Hair Strings. Lastly, I carefully glued down with liquid glue the Right Arm and Left Arm to the Torso as well as the Head. To finish the assembling off, I inserted the Head to the gold heat embossed Hair, and I added a pop of color by coloring the Bikini Top as well as a touch of color to her Face.

Once, I had the Mermaid Paper Doll assembled, I set aside, and I moved on to finish the ink blended background. So, I placed the card panel inside the stamping tool and I added lots of Embossing Powder Tool because, I was going to stamp the Sea Kelp from the Sea Kelp Stamp Set Marvelous Mermaids by Jane Davenport with Embossing Ink, and white heat embossed it with Opaque Bright White.

Well, at this point all I needed to do was to assemble the card so, I trimmed down with my paper trimmer the inked card panel to W 4-1/8” X H 5-3/8’’ and I adhered it down with double-sided tape to a gold card panel that measured W 4-3/8’’ X H 5-6/8’’ once, I had both card panel adhered together, I adhered them down to an A7 side folding white card panel. Lastly, I mounted the Mermaid Paper Doll to the card base with foam square adhesives to add dimension as well as a foiled sentiment. Finally, I glued down on each of her hands the Seashells that I had previously gold heat embossed over a scrap piece of the ink blended panel. The flower over her Head was also created it as well from an ink blended scrap piece. By the way, the Seashells are from the She Sells Seashells Stamp Set Marvelous Mermaids by Jane Davenport. So, to finish the card off, I covered her Hair with Nuvo Aqua Shimmer Pen for a sparkly look then, I added Glossy Accent to her Bikini Top, Lips and Seashells for an extra dimensional glossy look, and to add even more shine, I glued down with liquid glue here and there some of the Crystal Confetti.

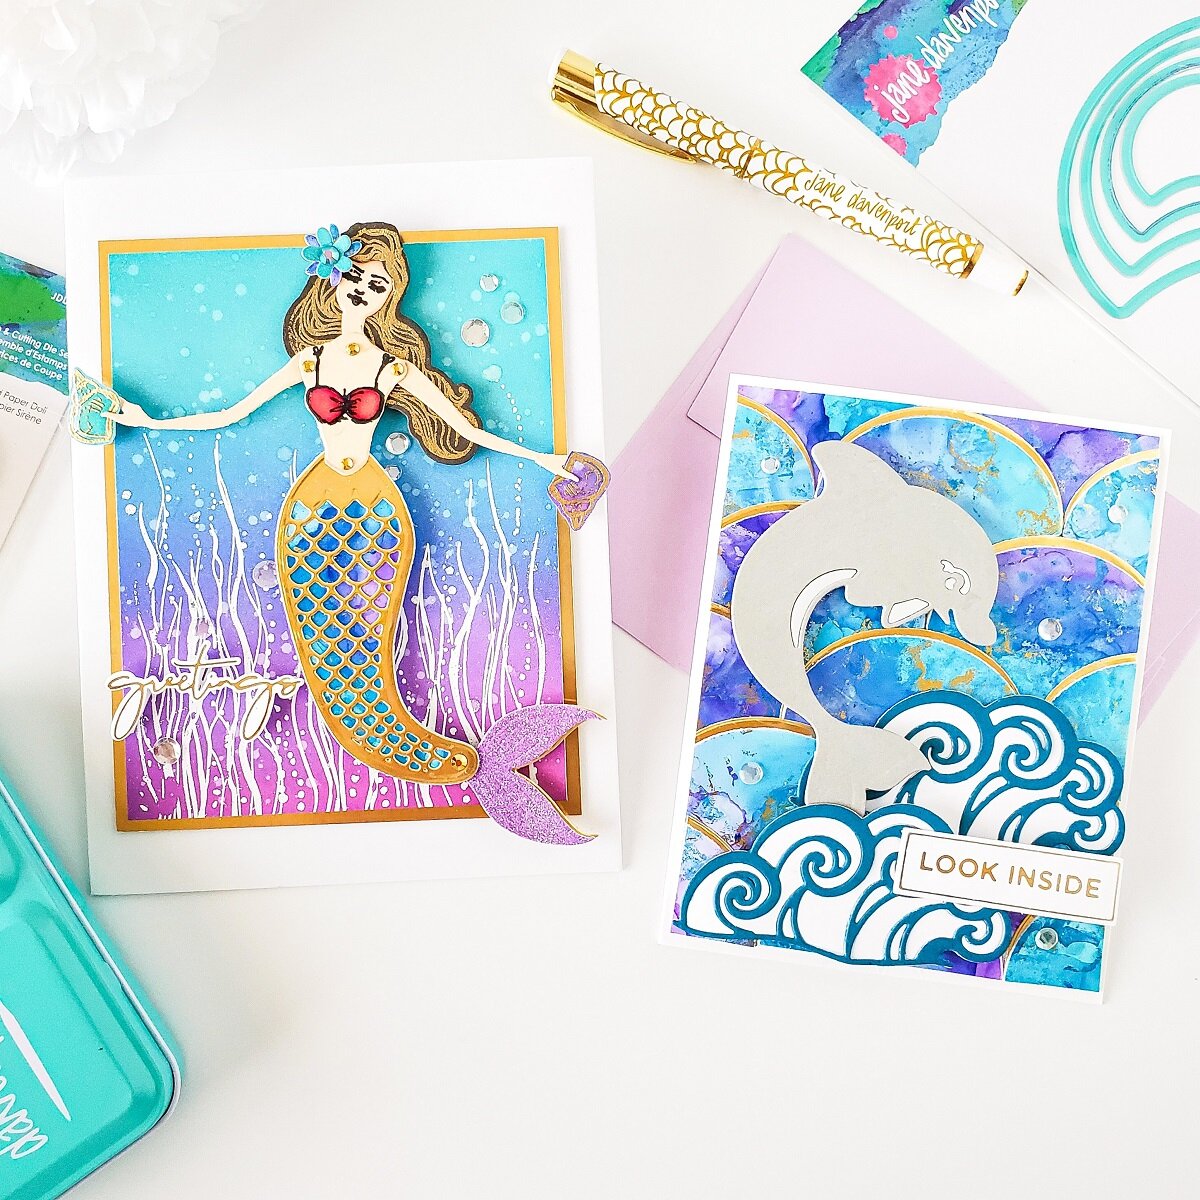
If the Mermaid Paper Doll was too much, I’d like to share with this much simpler card created with Happy Little Dolphin Etched Dies Marvelous Mermaids by Jane Davenport and Mermaid Scale Tiles Etched Dies Marvelous Mermaids by Jane Davenport so, let’s get started!

To create this card first, I started by creating the pattern for the card panel so, to do that I ran through the die-cutting machine the second-to-last smaller mermaid scallop tiles die from the Mermaid Scale Tiles Etched Dies Marvelous Mermaids by Jane Davenport to die-cut it 12X out of an ink blended card panel and 12X out of gold cardstock. Didn’t I say simpler!??? Well trust me because, it is… yet, the extra gold die-cutting gives an extra special touch.

So, moving on…after I was done die-cutting the Mermaid Scale Tiles, I stacked them all with liquid glue but, slightly offset as you can see in the image above to create the gold shadowing. Then, I created a scallop tiled pattern by adhering each of them down with double-sided tape to an A2 size white card panel. Right after the pattern was create, I trimmed the edges down slightly smaller than the card base and I adhered it down with double-sided tape to an A2 side folding white card base. Soon after that, I set the card base aside and I assembled the die-cutting pieces which I had previously die-cutting out of White Cardstock, Tin Pail Cardstock, Smoke Gray Cardstock and Blue Lagoon Cardstock using the dies from the Happy Little Dolphin Etched Dies Marvelous Mermaids by Jane Davenport.

To assemble the Dolphin, I poked the detailed pieces out from the darkest Gray die-cutting and I mounted it to the light Gray die-cutting making sure the detailed pieces were into place then, I mounted it with dimensional square adhesives to the card. Lastly, I stacked the Blue Lagoon die-cutting over the white waves and I adhered one of them with liquid glue and I mounted the other with foam tape to add dimension because, I wanted to create an illusion like if the Dolphin was jumping between both waves. YAY!!! Well, after creating that scene of the dolphin jumping in between the waves, I finished the card off by mounting a foiled sentiment and by gluing down a few crystals here and there to add a touch of sparkle.
With that being said, I hope that you’ve enjoyed learning about how, I’ve created these “Ocean Theme” cards showcasing stamps and die sets from the Marvelous Mermaids Collection by Jane Davenport by Spellbinders. → CLICK HERE this link will take you directly to the Spellbinders Blog Post on which you’ll see the step by step on how I’ve created the Slimline “Birthday Mermaid” card showcasing this gorgeous collection too. As always, I appreciate the time that takes you to read my blog posts. Below, you’ll find the supply list for the products used on today’s blog post. If, you get inspired by today’s project be sure to tag me on Instagram➝@cardsandcraftsbyyaz, I’d love to see what you’re creating.

Thank you and happy crafting, your time is valuable.
Don't forget to keep spreading kindness
Today and Always.
Love,
Yasmin
Supply List
Happy Little Dolphin Etched Dies Marvelous Mermaids by Jane Davenport
Mermaid Scale Tiles Etched Dies Marvelous Mermaids by Jane Davenport
Mermaid Paper Doll Stamp and Die Set Marvelous Mermaids by Jane Davenport
Sea Kelp Stamp Set Marvelous Mermaids by Jane Davenport
She Sells Seashells Stamp Set Marvelous Mermaids by Jane Davenport
Bubble Palace Stamp and Die Set Marvelous Mermaids by Jane Davenport
Watercolors Set Brights ArtEssentials by Jane Davenport
Tool ‘n One
Stylus Tips for Tool n' One
Tin Pail Cardstock
Blue Lagoon Cardstock
Glimmer Hot Foil Roll - Champagne
Glimmer Hot Foil System
Yana's Sentiments Glimmer Hot Foil Plate & Die Set
Platinum 6 Die Cutting and Embossing Machine
Peacock Feathers Distress Oxide
Mermaid Lagoon Distress Oxide
Wilted Violet Distress Oxide
Seedless Preserves Distress Oxide
Abandoned Coral Distress Oxide
Picked Raspberry Distress Oxide
Worn Lipstick Distress Oxide
Spiced Marmalade Distress Oxide
Mustard Seed Distress Oxide
Squeezed Lemonade Distress Oxide
TE Blender Brushes
Glossy Accent
Crystal Confetti
Nuvo Aqua Shimmer Pen
WOW! Opaque Bright White
WOW! Metallic Gold Rich
WOW! Embossing Ink Pad
WOW! Heat Embossing Gun Tool
Embossing Powder Tool
Sheer Shimmer Spritz Spray-Sparkle
Sheer Shimmer Spritz Spray-Gold
Warm Glow Cardstock
Charcoal Brown Cardstock
Smoke Gray Cardstock
Strathmore 300 Series Smooth Bristol Paper
Cougar 110# Heavy Weight Card Stock


More INFORMATION
FAQ About Spellbinders Kits

PLEASE NOTE
As part of the WOW! Designer Team, WOW! has provided me a code for all my lovely Subscribers to use. So, don’t forget to take the advantage of a crafty 10% off all purchase for both WOW!
US and UK by simply using my code: WOWDTYD
Here are the links for both websites weather you’re a US or UK user.
WOW! Embossing Powder US
WOW! Embossing Powder UK
Your imagination is Your limit.
All photography provided by Yasmin Diaz


Creativity is contagious, pass it on.
–Albert Einstein
Disclosure
I am creating this blog post with the purpose of sharing the way that I design my cards, the information provided here is based in my own opinion and creativity. I am not an expert by any means, and I only share the way that I design my cards. Most of the products use on my blog posts are personally purchased by me. However, I did received the products by Spellbinders and WOW! Embossing Powder. Please, keep in mind, all referral links were added for you to know from where I purchased or received the items from as, all of products shared and mentioned in each of my blog posts are simply because I use, and truly love them.