
Hello and Welcome! Today, I’m honored for joining Spellbinders for their January 2021 Clubs Kit Inspiration Blog Hop! Throughout the hop, you’ll see amazing projects created by many talented designers showcasing this month’s Club Kits. Therefore, to get you inspired I will be sharing this feminine “Valentine’s Day” slimline card showcasing both Large Die of the Month & Glimmer Hot Foil Kit Of The Month Club. So, without further ado let’s jump right into the step-by-step for how I made it ↓

To begin with, I started by lining up over a large piece of white cardstock the slimline die from Large Die of the Month and then, I went ahead to run them through my Platinum 6 Die Cutting and Embossing Machine.

Next, right after that I was done die-cutting the frame, I went ahead to use my Tool ‘n One to pop the hearts out of the white slimline card panel and once I had that step done, I went ahead to glue down with liquid glue the die-cutting detailed frame over a large piece of light pink color cardstock.

Therefore, after I had the die-cutting detailed frame glued down over the cardstock, I went ahead to trim off the edges from it and then, I’ve gone ahead to get the slimline card panel adhered with double-sided tape over a white slimline card base.

Moving on, I went ahead to set the card base off to the side to start the die-cutting for the greenery. Thus, for the greenery I kept it simple by die-cutting them out white cardstock so, to do that I lined up the greenery dies from the set and I went ahead to die-cut a few of them out of white cardstock. As I mentioned earlier, I also used Glimmer Hot Foil Kit Of The Month Club to make this slimline card thus, I used the small flowers dies from the set to die-cut some flowers out of white cardstock.

Having all die-cutting pieces done, I went ahead to create three little clusters with them and then, I set them off to the side. Meanwhile, I went ahead to mount two foiled hearts on each side of the card using pieces of craft foam tape to add dimension. To foil the hearts, I used one of the heart glimmer plates from the club lit along with Glimmer Hot Foil Roll - Polished Brass. As for the detailed heart in the middle of the card, I went ahead to use the layering dies included in the Large Die of the Month to die-cut two layers out pink and one out of gold cardstock. So, once I had finished layering the die-cutting heart, I went ahead to mount it in the middle of the card using a piece of craft foam tape to level the dimension from all three hearts.
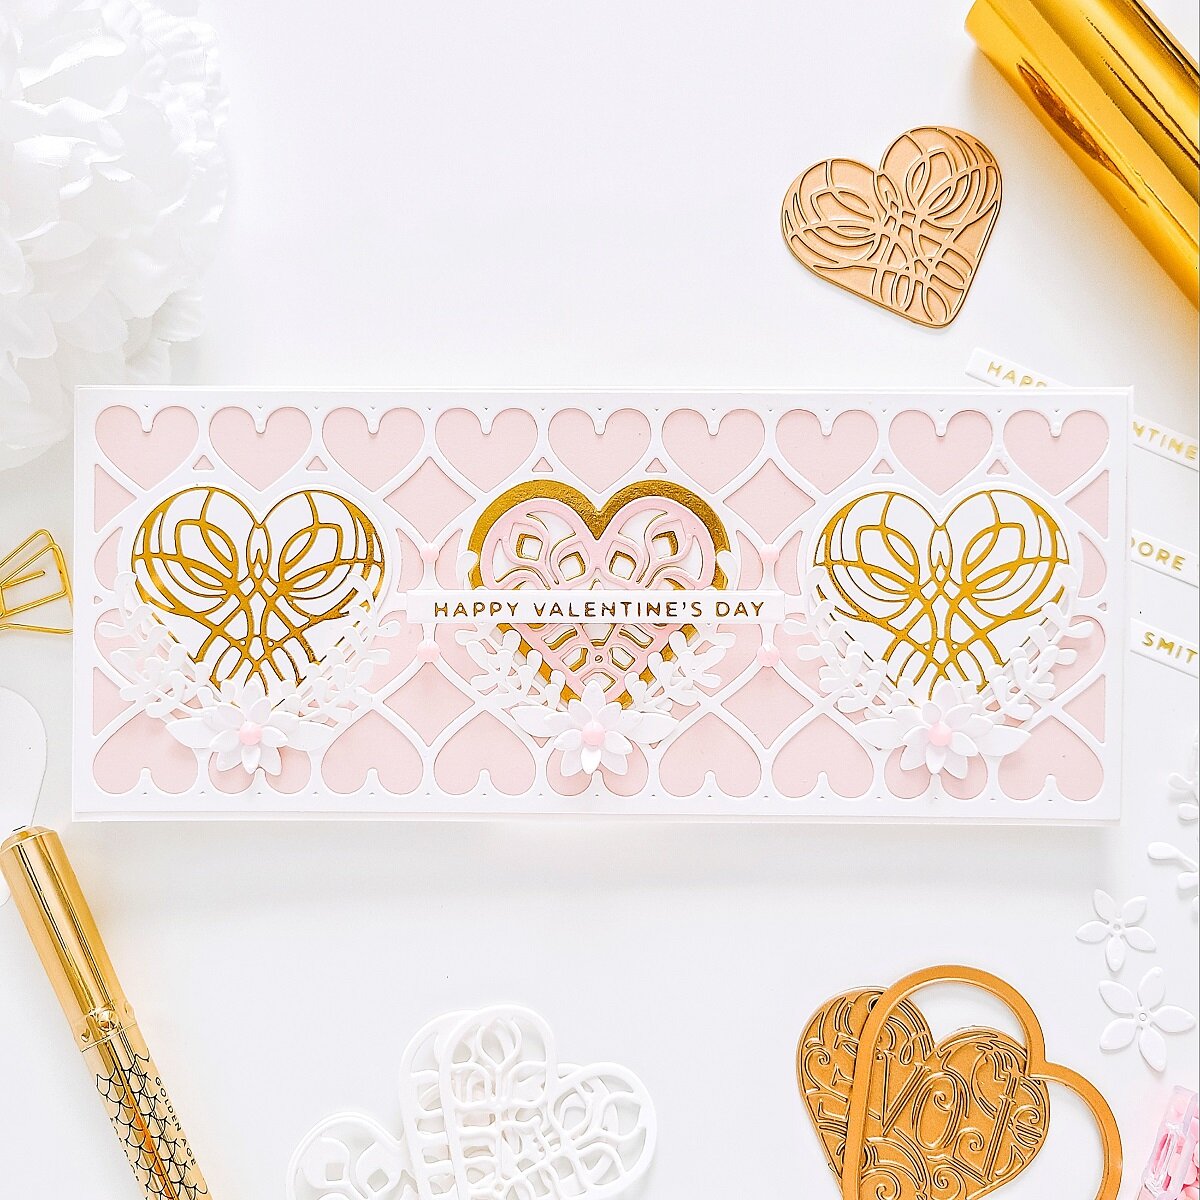
Lastly, to embellish the card I went ahead to glued down with liquid glue (as shown i the image above) the little clusters which I had previously created with the greenery die-cutting pieces. To finish the card off, I went ahead to mount the foiled Happy Valentine’s Day sentiment in the middle of the card and then, I went ahead to glue down with liquid glue here and there some crystal and pinks jewels to add an extra touch of shine! With that being said friends, I hope you’ve enjoyed reading the step-by-step for how I made this feminine “Valentine’s Day” slimline card showcasing both Large Die of the Month & Glimmer Hot Foil Kit Of The Month Club by Spellbinders.
Below you’ll find the full list for the amazing designers participating on this awesome hop, also to celebrate Spellbinders is giving away a $50.00 gift certificate to 3 lucky blog readers – selected from the comments on their blog. Giveaway closes on Sunday, January 17th, 11:59 PM MST. And winners will be announced in their blog hop post the following Tuesday nevertheless, winner is responsible for shipping cost, duties, and taxes.
Blog Hop List
Spellbinders Blog
Tina Smith
Becky Roberts
Desiree Kuemmerle
Carrie Rhoades
Bibi Cameron
Laurie Willison
Jill Hilliard
Marie Heiderscheit
Jennifer Snyder
Jean Manis
Henriëtte van Mierlo
Annie Williams
Yasmin Diaz
Brenda Noelke
Betty Wright
Melody Rupple
Jenny Colacicco
Dilay Nacar
Hussena Calcuttawala
Mindy Eggen
Virginia Lu
Emily Leiphart
As always, I appreciate the time that takes you to read my blog posts. Below, you also will find the supply list for the products used on today’s blog post. And… If, you get inspired by today’s project be sure to tag me on Instagram ➝@cardsandcraftsbyyaz, I’d love to see what you’re creating.
Thank you and happy crafting.
Stay Awesome & Beautiful
— Today & Always —
Love,
Yasmin


More INFORMATION
FAQ About Spellbinders Kits
Your imagination is Your limit.
All photography provided by Yasmin Diaz


Creativity is contagious, pass it on.
–Albert Einstein
Disclosure
I am creating this blog post with the purpose of sharing how I design my cards, the information provided here is base in my own opinion and creativity. I am not an expert by any means and I only share the way that I design my cards. Most of the products used for my blog posts are personally purchased by me. However, I did receive the products by Spellbinders.
Please, keep in mind that, all referral links are added for you to know from where either, I purchase or receive the items from as, all products shared and mentioned in each of my blog posts are simply because I use and genuinely love them.
However, I’d like to mention that links from Altenew, Pinkfresh, Scrapbook.com and Spellbinders are affiliated links which means that I get paid a small commission when a purchase is made thru that particular link at no additional cost to you.
Also, I am not paid by any company to promote their products nor any company sponsors my blog. I pay for my own website, I take my photography, I personally type my blog post, I enter links and even better I make every single card. I try my best working every day a little bit here and a little bit there striving for a professional and friendly use to you. With that said, your support is so much appreciated as if you use those links your help will give me to keep this website running.
Thank you and have a wonderful crafty-shopping!