
Happy Tuesday, Friends! On today’s blog, I’d like to share with you an inspiration set of holiday cards with a “Poinsettia” look featuring: "Wonderful Christmas" OCT-2022 Clear Stamp & Die of the Month Club. Along with this month’s clear stamp & die of the month club, I used Embossing Folder of the Month Club and one patterned paper sheet from the paper pad included in this month’s Card Kit of the Month Club all clubs by Spellbinders. So, without further ado let’s jump right into the step-by-step for how I made them ↓

Therefore, I started off by getting the stamping done over a large piece of white cardstock. So, to do that, I went ahead to place the cardstock piece inside the MISTI Stamp Tool and then, I proceeded to lay down over it each stamp image, to get them stamped twice using Brutus Monroe Embossing Ink. But, before getting that step done, I went ahead to use the Magic Powder Bag to remove any static from the cardstock for a cleaner stamping and heat embossing look. Once , I had the stamping done, I quickly proceed to do the heat embossing step and, to to do that, I used per usual Metallic Embossing Powder- Gilded and Wow Embossing Powder Dual Speed Heat Tool. hat being said, as soon as, I’ve gotten finished the heat embossing fora each stamped image, I’ve gone ahead to add pops of colors to them using traditional holiday hues. By the way, I used alcohol markers as my color media to color them in.
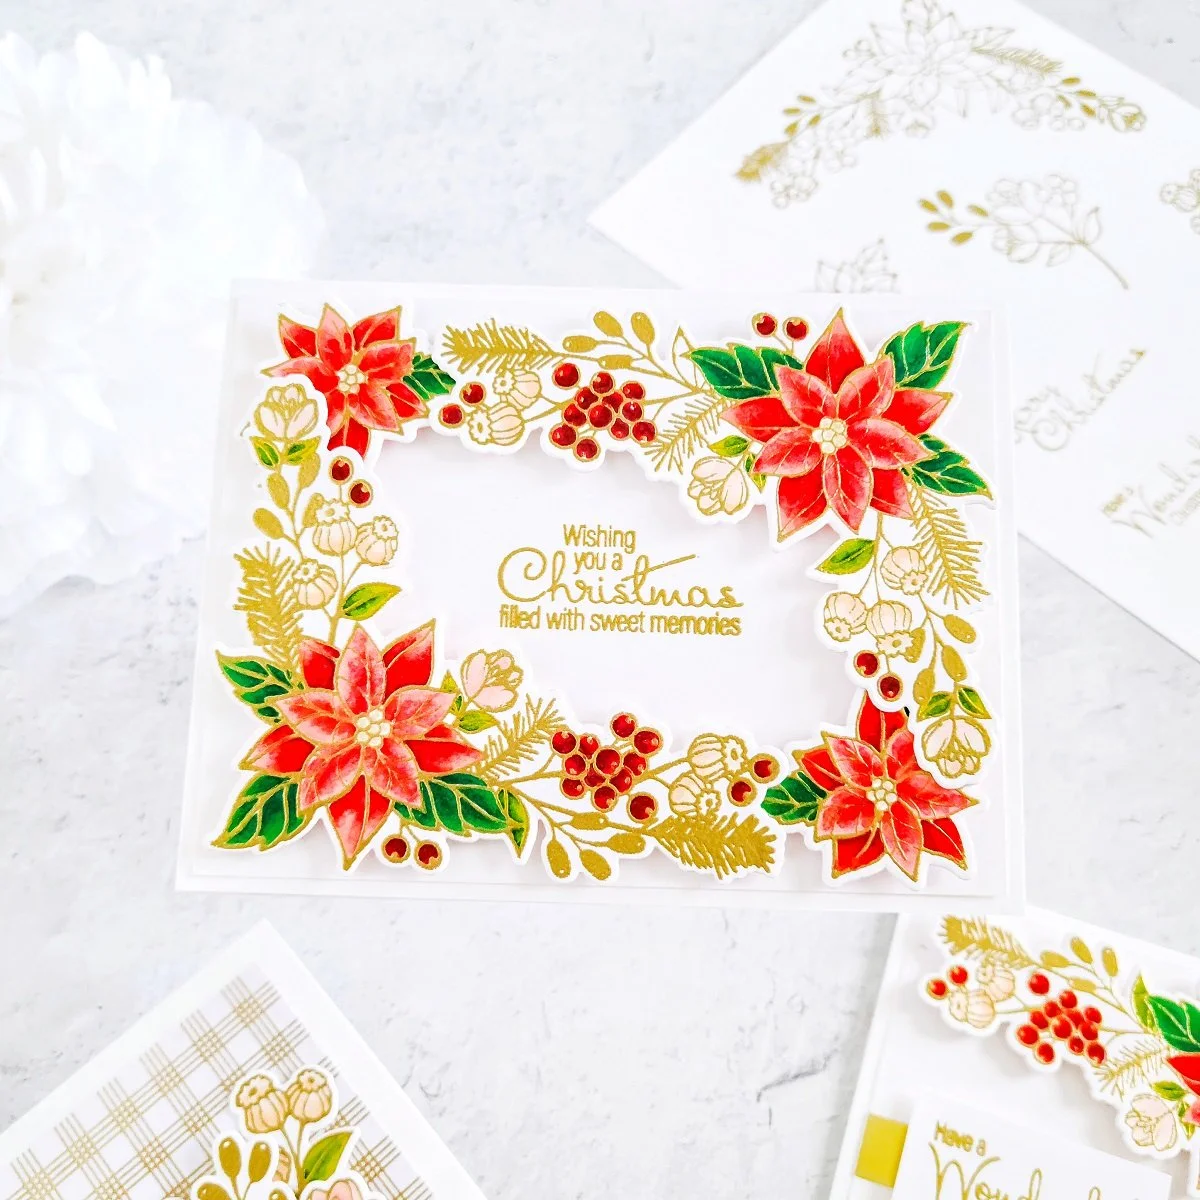
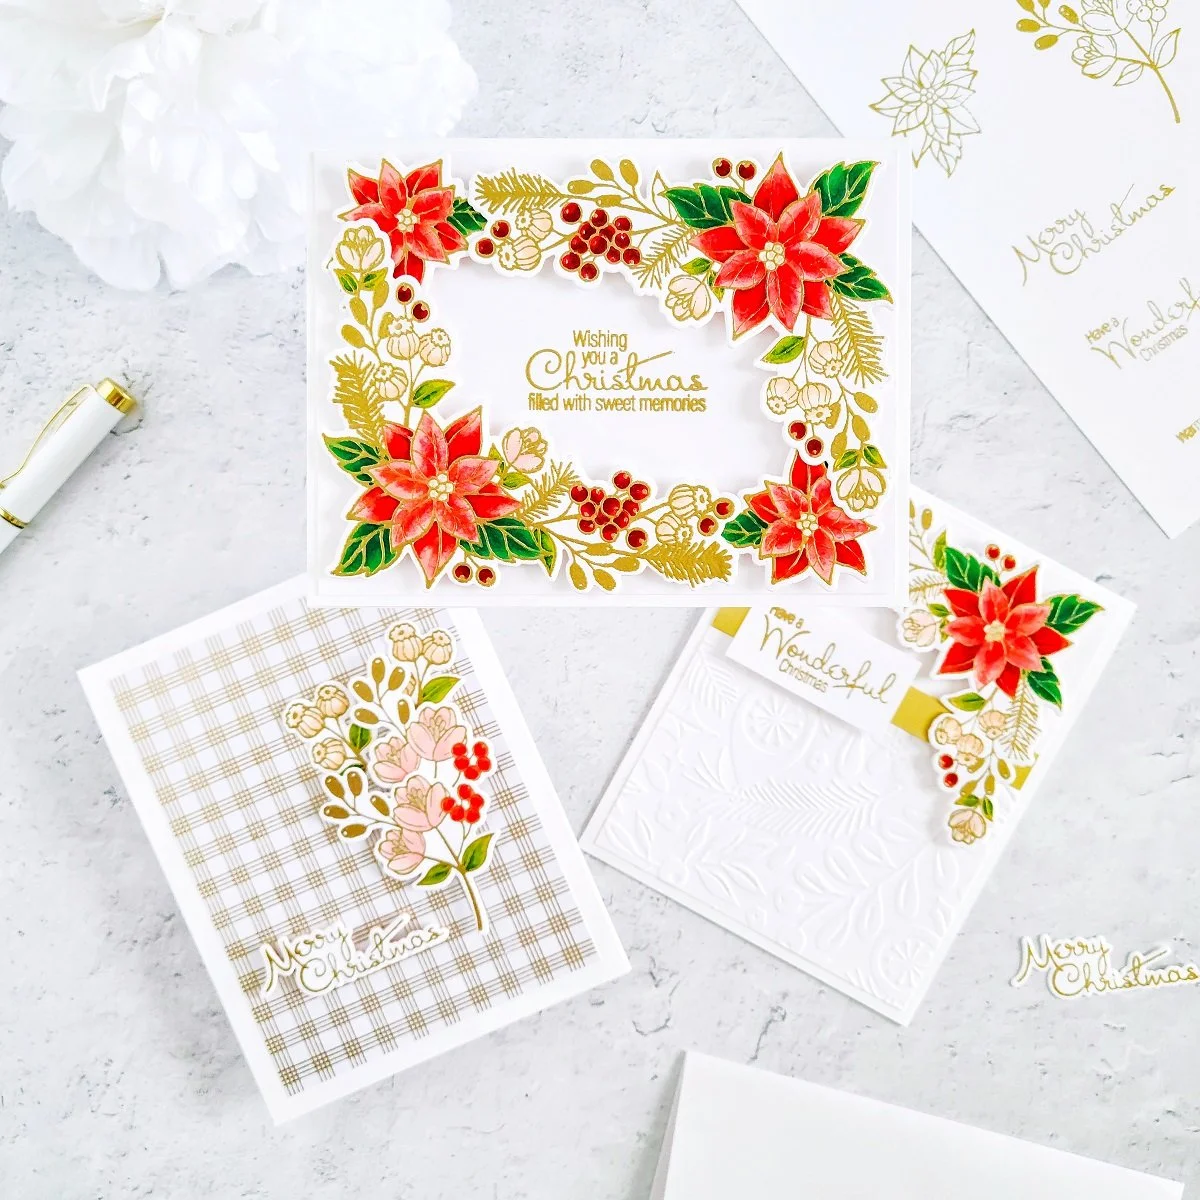
Next, after getting each images colored in, I went ahead to use each coordinating die included in the club along with Platinum 6 Die Cutting and Embossing Machine to cut out each image from the cardstock piece. And then, right after that I had gotten the die-cutting process completed, I moved on to get the card assembling started. Thus, I went ahead to trim down a card panel smaller than the card base and then, I got one of the card sentiments included in the stamp set stamped and gold heat emboss in the center of it. Then, after getting that step completed, I went ahead to get its backing adhered with double-sided adhesive to an A2 size side folding white card base in a landscaping form. Lastly, I proceeded to get the large poinsettia cluster mounted with craft foam adhesives in the lower left and upper right corners of the front card panel. And finally, to add a full poinsettia frame effect to the front card panel, I proceeded to mount the single poinsettia image to the upper left and lower right corners on the front card panel to finish off that way the first example.
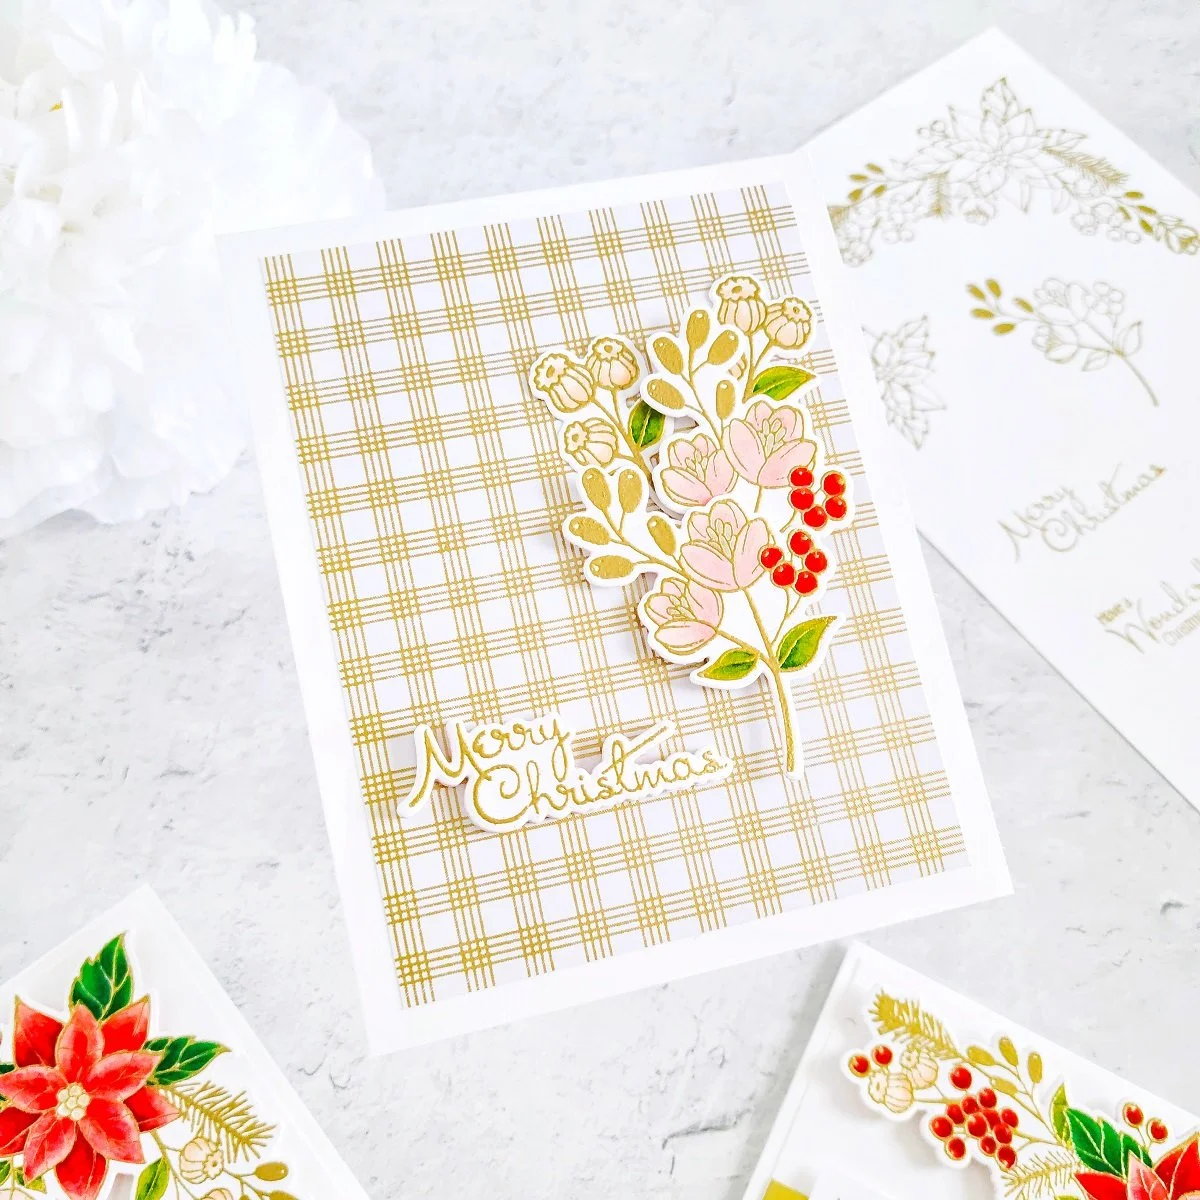
For the second example, I made a simpler card design so, to do it first, I went ahead to select one of the patterned paper sheets with foil accents from the patterned paper pad included in this month’s Card Kit of the Month Club.
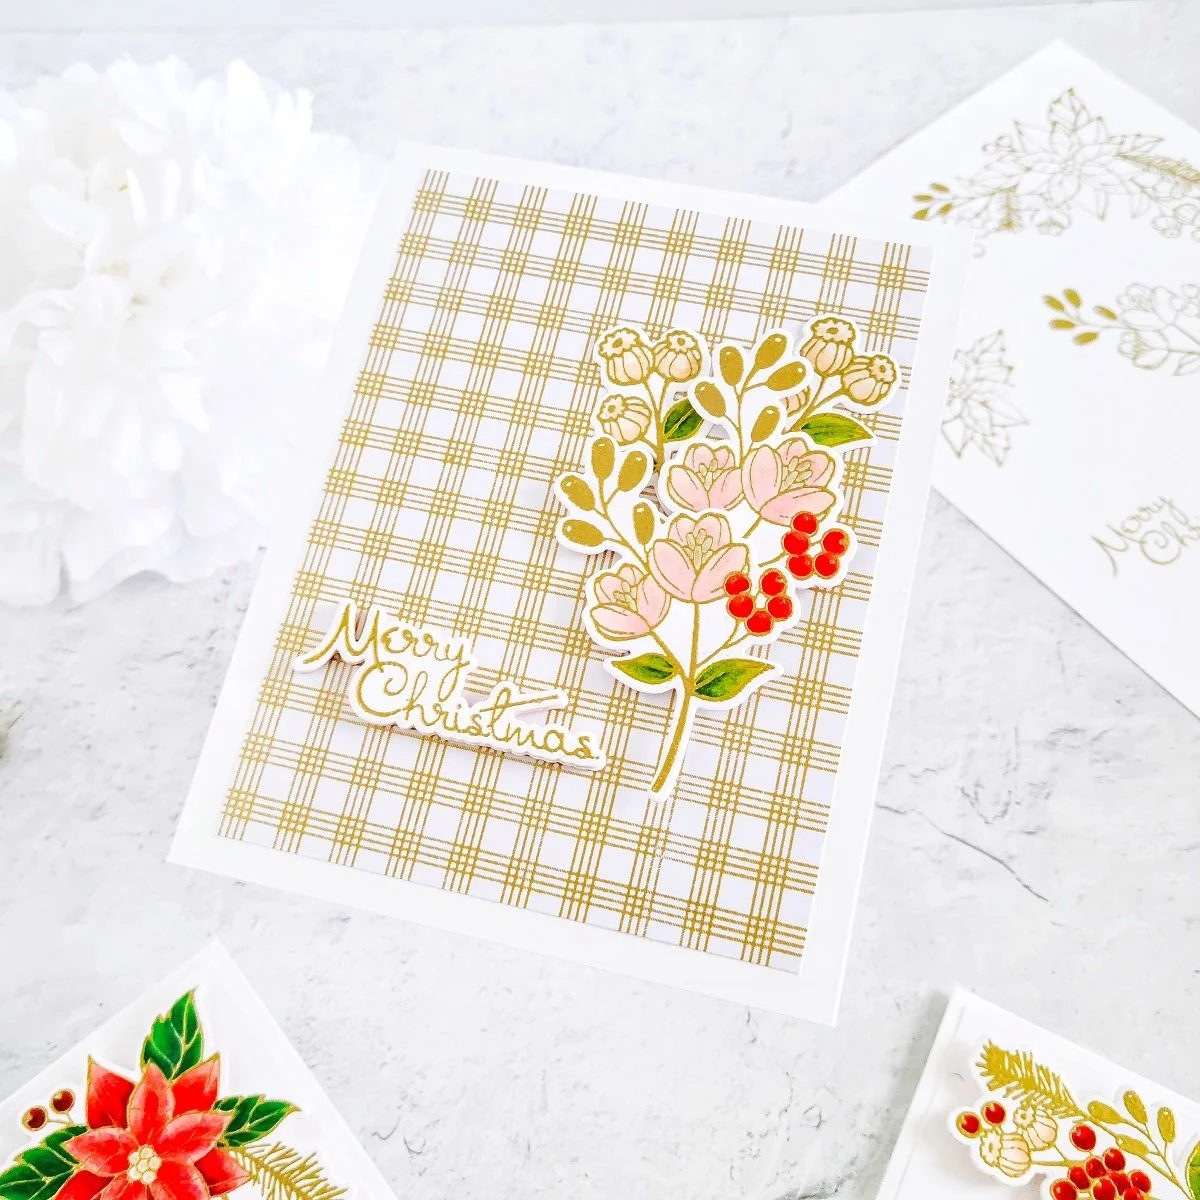
Once, I had that patterned paper sheet selected, I went ahead to use my Paper Trimmer to get it trimming down 1/2 of an inch smaller than the card base. Next, after getting it trim down, I proceeded to get its backing adhered with double-sided adhesive to an A2 size top folding white card base.
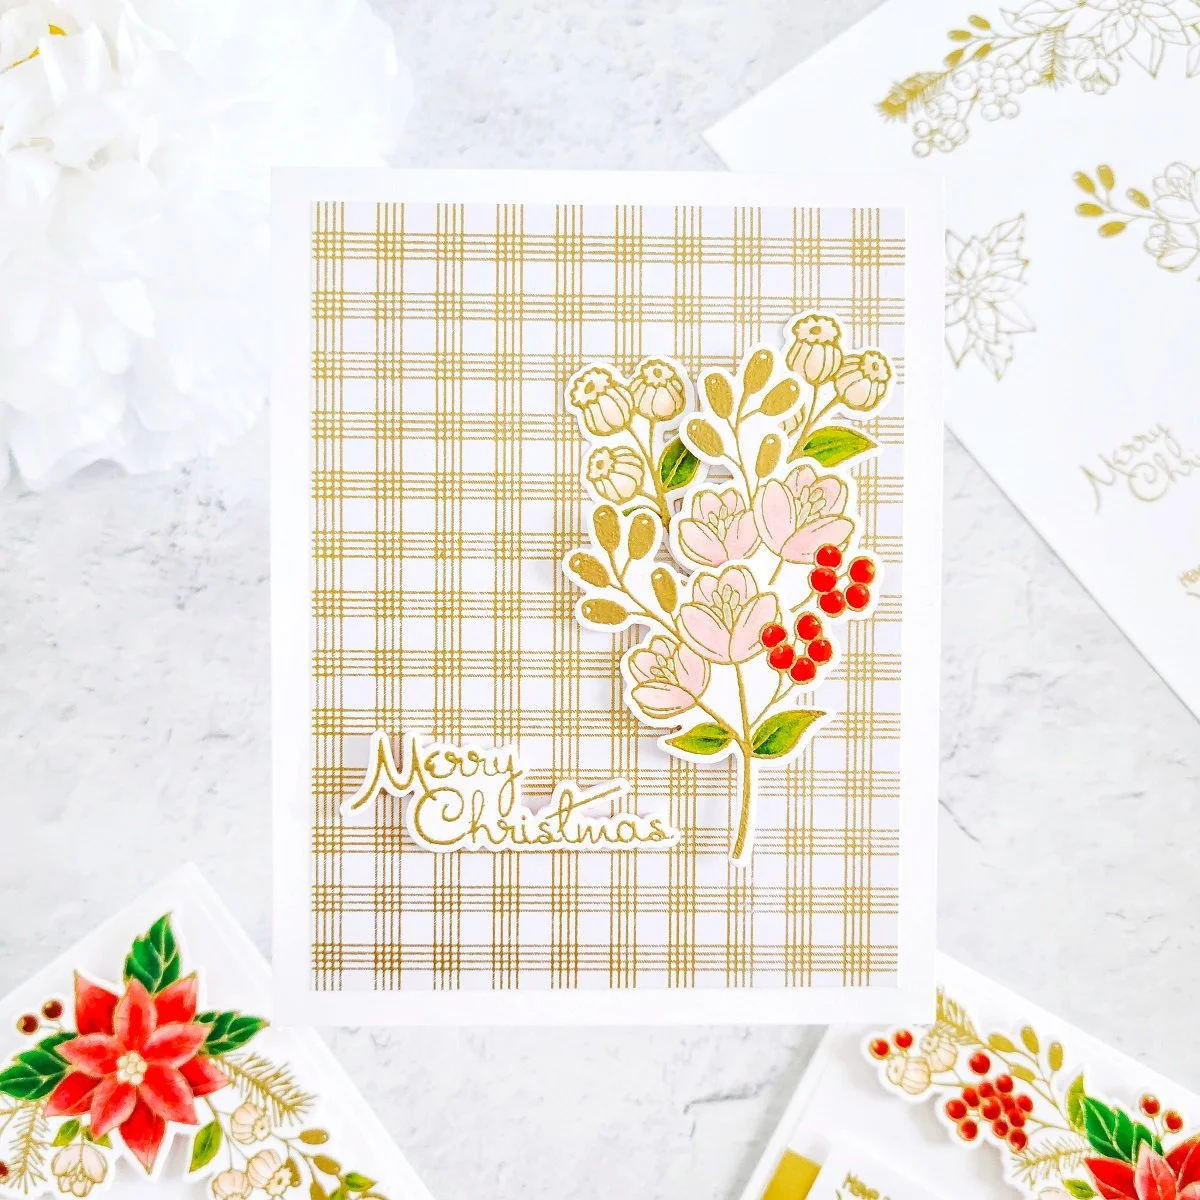
Moving on, after getting the backing of the patterned paper sheet adhered to the card base, I went ahead to get the small floral cluster along with two more of the smaller floral clusters to create a full bloom image over the right side of the front card panel. So, after getting the floral cluster mounted over the front card panel, I went ahead to finish the card off by adding one of the card sentiments; sentiment which, I had gotten previously stamped and die cut out of white cardstock.
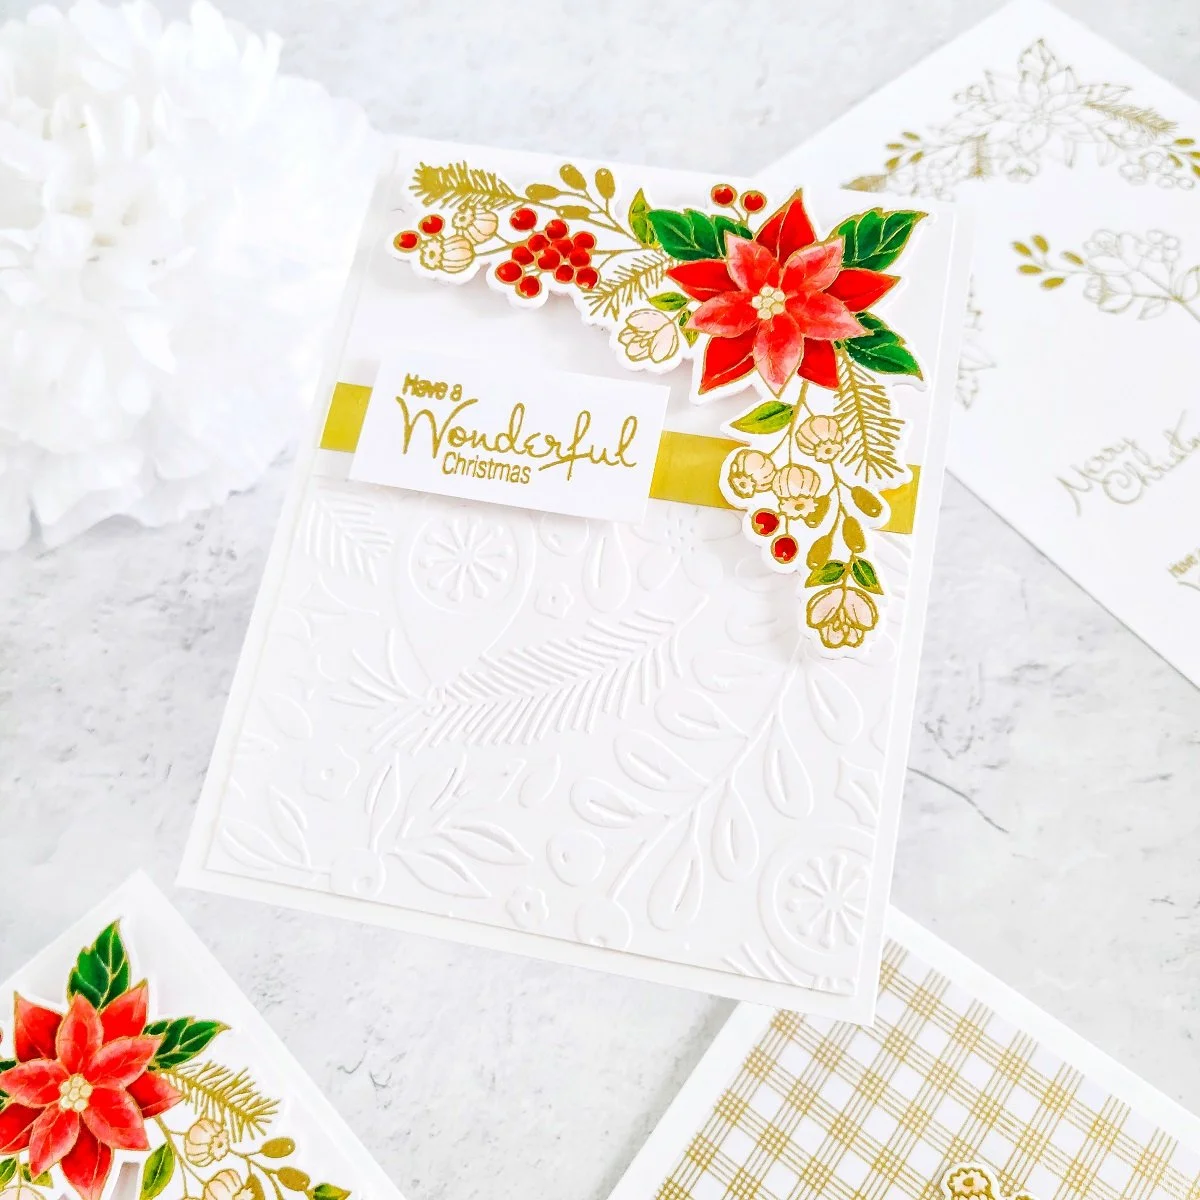
Then for the last example, I made a simpler look design but with a delicate textured appearance. Thus, to add the texture to the front card panel, I went ahead to place 3/4 of an A2 size white card panel inside this month’s Embossing Folder Kit of the Month Club and then, I proceeded to run them through the die cut machine following the step for the dry embossing technique.
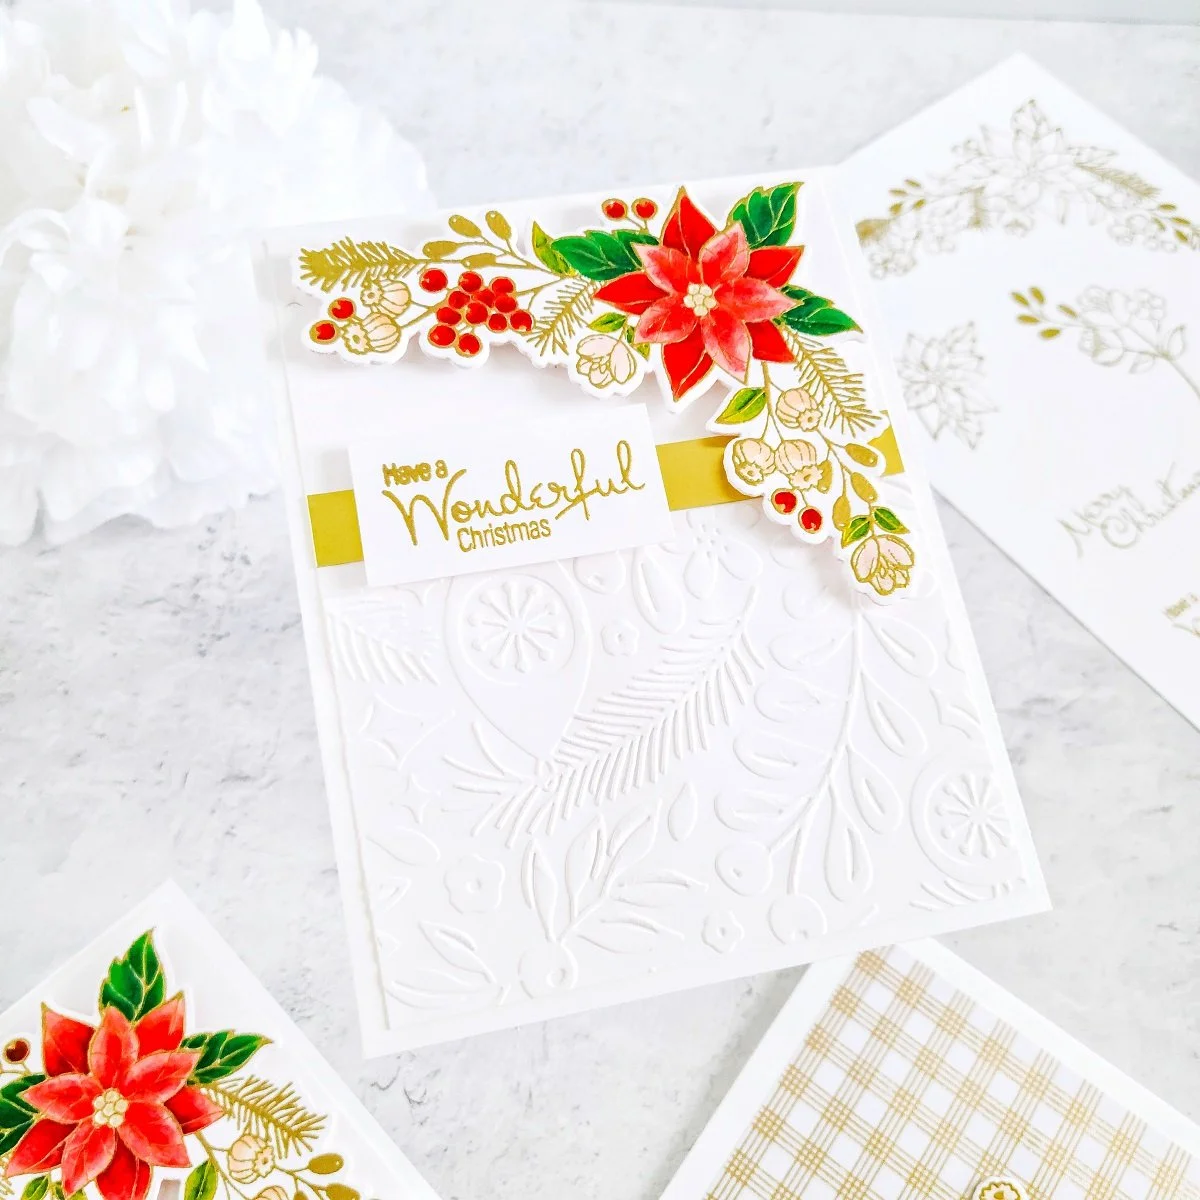
Consequently, after getting the partial dry embossing effect over the card panel, I went ahead to trim down one 1/4 of an inch from each side using the paper trimmer and then, I got the backing of it adhered with double-sided adhesive to an A2 size top folding white card base. Lastly, to cover up the joint from the partial dry embossing effect, I went ahead to trim down a smaller piece of gold cardstock and then, I got it adhered to the front card pane. Then, to finish the card off, I got mounted the large poinsettia cluster on the right upper corner and last but certainly not least, I got the card sentiment mounted with craft foam adhesive to add dimension over the gold cardstock piece just like, you can see it in the image above.
And, with that being said friends, I hope you’ve enjoyed reading the step-by-step for how I’ve made this inspiration set of holiday cards with a “Poinsettia” look featuring: "Wonderful Christmas" OCT-2022 Clear Stamp & Die of the Month Club along with this month’s Embossing Folder of the Month Club and one patterned paper sheet from the paper pad included in this month’s Card Kit of the Month Club by Spellbinders. As always, I appreciate the time that takes you to read my blog posts. Below, you’ll find the supply list for the products used on today’s blog post. If you get inspired by today’s projects, be sure to tag me on Instagram ➝@cardsandcraftsbyyaz I’d love to see what you’re creating.
Thank you and happy crafting.
Stay Awesome & Beautiful
— Today & Always —
Love,
Yasmin
Your imagination is Your limit.
Supply List
Clear Stamp & Die of the Month Club
Embossing Folder Kit of the Month Club
Card Kit of the Month Club
Glimmer Hot Foil System
Glimmer Hot Foil Roll - Gold
Bearly Art Precision Craft Glue
Tool and Accessories Main Attraction
Platinum 6 Die Cutting and Embossing Machine
Gold Mix Color Essentials Gems
Detail Black Ink
Tool ‘n One
Memory MISTI
MISTI Stamp Tool
MISTI Mini Stamp Tool
Permanent Tape Runner
Double Sided Adhesive Foam Strips
Double Sided Adhesive Foam 1/4 Roll
Double Sided Adhesive Foam Roll 1'‘
Clear Double Sided Adhesive Roll - 1/4 Inch
6 Pack Flat top Craft Ink Blending Brushes
Precision Tip Scissors
Porcelain Watercolor Paint Palette
Silver Brush - Limited Black Velvet Master Travel Set
Scoring Board
Jewels Picker
Rhinestones Sunlight Gold
Comfort Paper Trimmer
Glossy Accent
Crystal Diamond Glitter
Nuvo Aqua Shimmer Pen
Mini Desktop Vacuum Cleaner
Recollections Gold Foil Cardstock
Craft Treat Teflon Bone Folder
Acrylic Heart Brush/Pen Holder
Mini Ink Blending Brushes
Tonic Studios Nuvo Media Spatulas
Viva Decor 3-Piece Palette Knife Set
Liquitex Basics Light Modeling Paste
Handy Art Designer's Palette Artist Acrylic Modeling Paste
6 Pack Flat top Craft Ink Blending Brushes
Sizzix - Big Shot Switch Plus Machine
VersaMark Ink Pad
Inkadinkado Embossing Powder Tool
Brutus Monroe Embossing Ink
Magic Powder Bag
Embossing Ink Reinker
Magic Powder Bag - Refill
Embossing Powder Ultra Fine Alabaster
Metallic Embossing Powder- Gilded
Wow Embossing Powder Dual Speed Heat Tool
Wow Embossing Powder Gold Pearl
Hammermill Cardstock
Hammermill Cardstock 100lb - 100 Bright 8.5x11 6 Pack
Hammermill Cardstock 80lb -100 Bright 8.5x11 8 Pack
Hammermill Cardstock 100 lb - 100 Bright 17x11
Hammermill Cardstock 80lb - 100 Bright 17x11
Crafter's Essential Cutting and Alignment Mat
More INFORMATION
FAQ About Spellbinders Kits
Spellbinders Club Kit Options
Small Die Kit of the Month Club
Large Die Kit of the Month Club
Card Kit of the Month Club
Glimmer Hot Foil of the Month Club
Amazing Paper Grace Die of the Month Club
Clear Stamp of the Month Club
Clear Stamp & Die of the Month Club
Embossing Folder of the Month Club
Die Hard Value Club
Die & Stamp Addict Club Membership
Kit & Caboodle Value Club
The Total Package Club Membership
All photography provided by Yasmin Diaz


Be sure to follow me on Instagram for more as I share fun mini tutorial for how I made the cards in my reel section there!
Creativity is contagious, pass it on.
–Albert Einstein
Disclosure
I am creating this blog post with the purpose of sharing how I design my cards, the information provided here is base in my own opinion and creativity. I am not an expert by any means, I only share the way that I design my cards. Most of the products used for my blog posts are personally purchased by me. However, I did receive the products by Spellbinders.
Please, keep in mind that, all referral links are added for you to know from where either, I purchase or receive the items from as, all products shared and mentioned in each of my blog posts are simply because I use and genuinely love them.
However, I’d like to mention that links from Amazon Associates, Altenew, Pinkfresh, Pigment Craft Co, Scrapbook.com, Spellbinders and Waffle Flower Crafts are affiliated links which means that I get paid a small commission when a purchase is made thru that particular link at no additional cost to you.
Also, I am not paid by any company to promote their products, nor any company sponsors my blog. I pay for my own website, I take my photography, I personally type my blog post, I enter links and even better I make every single card. I try my best working every day a little bit here and a little bit there striving for a professional and friendly use to you. With that said, your support is so much appreciated as if you use those links your help will help me to keep this website running.
Thank you and have a wonderful crafty-shopping!