
Spellbinders Botanical House┃Inspiration Card
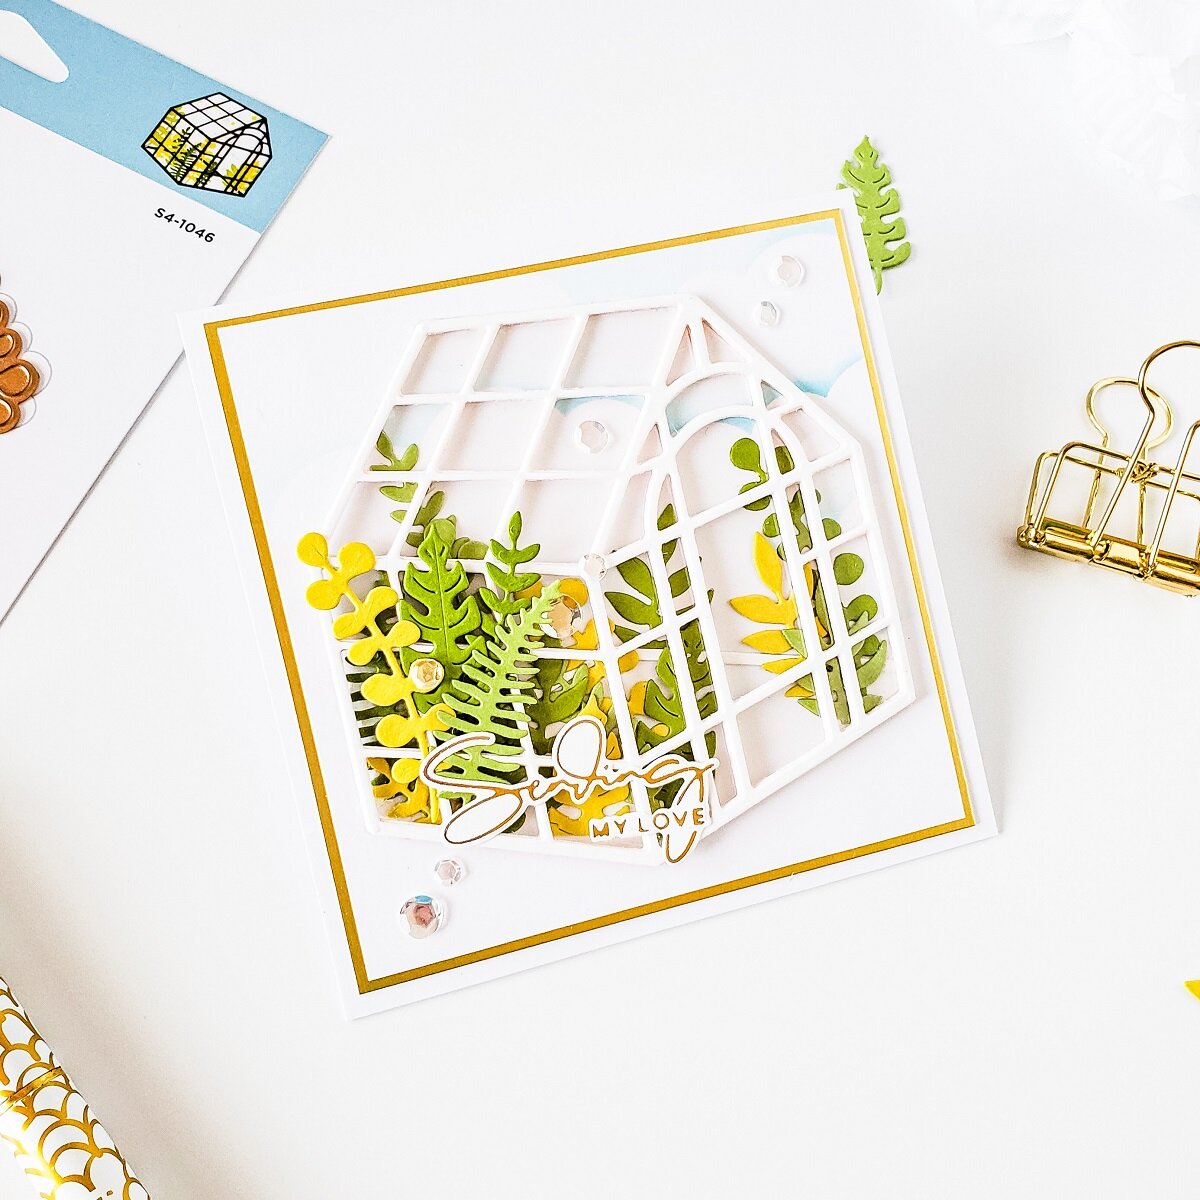
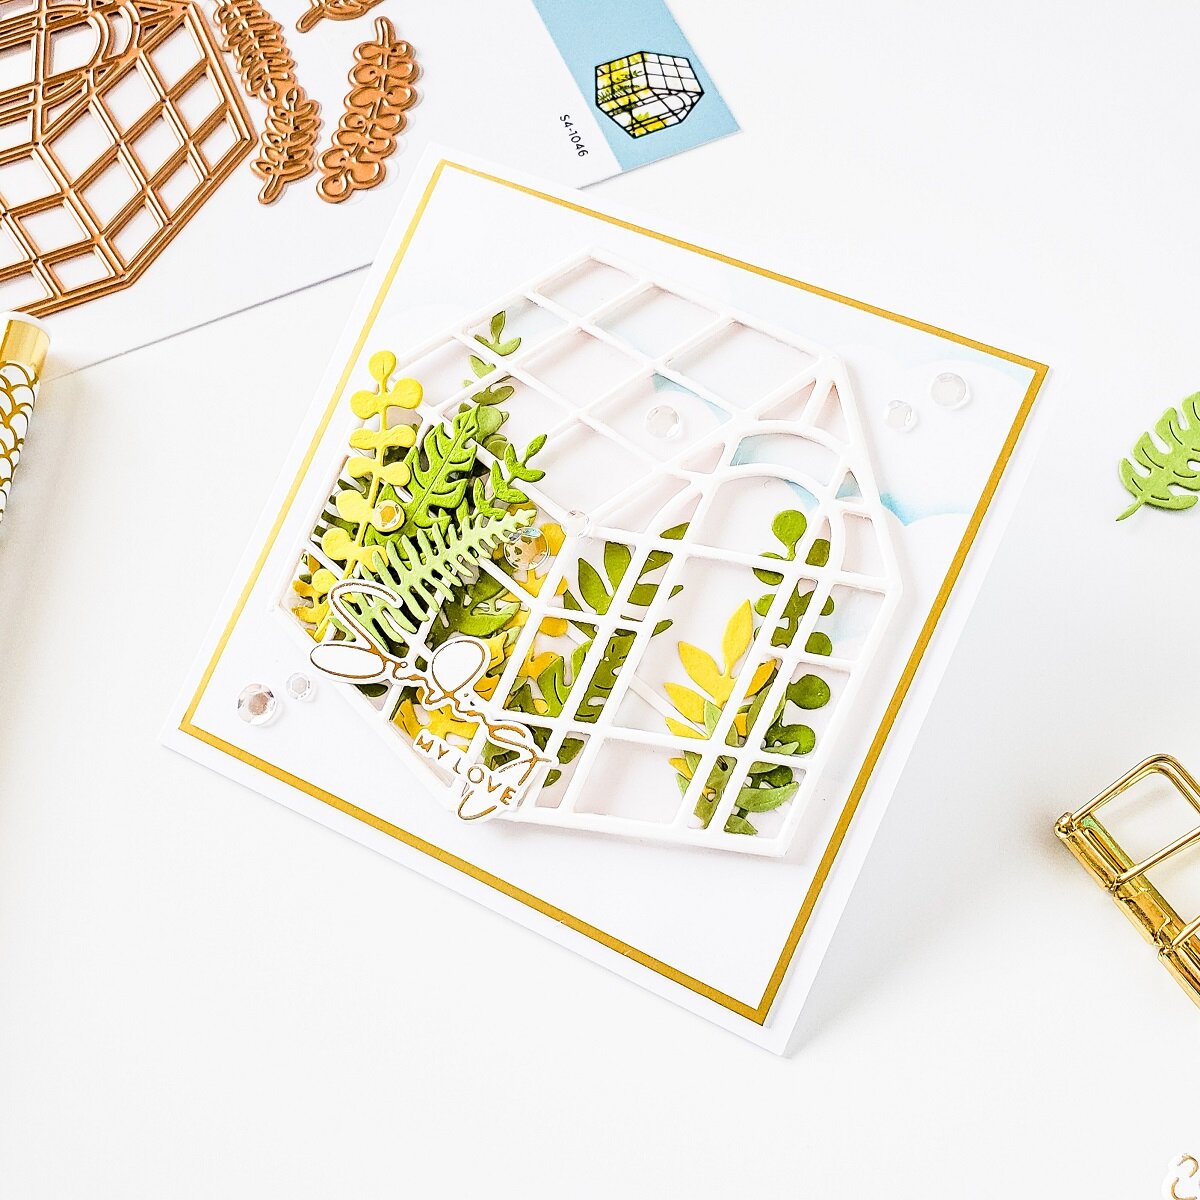
Happy Thursday, Friends! Yasmin here sharing with you this Botanical House inspiration card that, I made with the; Botanical House Die Set from the March Dies & Glimmer Plates release by Spellbinders. In my opinion, this is the perfect die for a clean and simple Spring look greeting card. The March release also has other fabulous Dies and Glimmer Hot Plates sets which, I’ve previously use to create 2 Thank you cards, I’ll be adding an image and the link below in case you want to check them out as, I shared them yesterday on Spellbinders ‘Blog. So, without further ado, let’s jump to the step by step on how I made it ↓
To begin with, I started by trimming, scoring and folding in half a 4-1/4’’x 4-1/4’’ in square white card base.
To create the gold frame, I trimmed down a large piece of gold cardstock to 4.0’’x 4.0’’ inches, and I adhered the backing of it with double-sided tape to the white card base.

Then, to create a subtle sky I slightly inked up over a white card panel using; Tumbled Glass Distress Oxide and Cloud Mix-ables Stencil. Once, the clouds were ink up over the white cardstock, I trimmed down the card panel to 3-7/8’’x 3-7/8’’ inches, and I adhered the backing of it with double-sided tape to the card base.

At this point my card base was complete so therefore, I set the card base aside, and I moved on to the fun part which, in this case was the die-cutting process. So, for the die-cutting process, I ran through my Platinum 6 Die Cutting and Embossing Machine the house frame die from the Botanical House Die Set to die-cut it 4X out of white cardstock. The die set also has a die the creates a thin line die-cutting so, I went ahead to die-cut it out of white cardstock as well.

After, all die-cutting pieces were done, I stacked the frames, and I adhered the dimensional frame to a large piece of Acetate which soon after that, I trimmed the excess of it with the paper trimmer. To finish the frame off, I adhered the thin die-cutting line to the back with liquid glue, and I set it aside. In the meantime, I ran through the die-cutting machine the dies that die-cut the greenery, and I die-cut them a few times out of Light, Medium and Dark Green hues cardstock.

Lastly, after all foliage die-cutting pieces were finish, I placed the dimensional house in the center to use it as a guide because, I glued down with liquid glue some of the foliage on the right side and some on the left side so, once the foliage pieces were in place, I mounted the house with skinny pieces of clear foam tape to add dimension. I wish you could how the acetate added a glass reflection look to the house, but I know it’s very difficult to capture it due its transparency.

Last but not least, to add even more dimension, I glued down with liquid glue some of the foliage that I have left in the front side of the house followed by the sentiment which, I had previously foiled in a piece of white cardstock, and to finish the card off, I glued down here and there a few crystal sequins to add a touch of shine. With that being said, I hope you’ve enjoyed reading the step by step on how I’ve created today’s “Botanical House” card showcasing one of the new; March Dies & Glimmer Plates by Spellbinders. As always, I appreciate the time that takes you to read my blog posts. Below, you’ll find the supply list for the products used on today’s blog post along with the link for the cards that, I shared yesterday on Spellbinders ‘blog. If, you get inspired by today’s project be sure to tag me on Instagram➝@cardsandcraftsbyyaz I’d love to see what you create.

Thank you and happy crafting, your time is valuable.
Don't forget to keep spreading kindness
Today and Always.
Love,
Yasmin
Supply List
Botanical House Die Set
Yana's Sentiments Glimmer Hot Foil Plate & Die
Lemon Grass Cardstock
Tool ‘n One
Shapeabilities Kaleidoscope Tile Etched Dies
Shapeabilities Kaleidoscope Strip Etched Dies
Honeycomb Alphabet Glimmer Hot Foil Plates
Border Greetings Glimmer Hot Foil Plates
Watermelon Fusion Cardstock
Bubble Gum Cardstock
Glimmer Hot Foil Roll - Champagne
Glimmer Hot Foil System Platform
Platinum 6 Die Cutting and Embossing Machine
Tumbled Glass Distress Oxide
Cloud Mix-ables Stencil
TSM Cardstock
Cougar 110# Heavy Weight Card Stock


More INFORMATION
FAQ About Spellbinders Kits

PLEASE NOTE
As part of the WOW! Designer Team, WOW! has provided me a code for all my lovely Subscribers to use. So, don’t forget to take the advantage of a crafty 10% off all purchase for both WOW!
US and UK by simply using my code: WOWDTYD
Here are the links for both websites weather you’re a US or UK user.
WOW! Embossing Powder US
WOW! Embossing Powder UK
Your imagination is Your limit.
All photography provided by Yasmin Diaz


Creativity is contagious, pass it on.
–Albert Einstein
Disclosure
I am creating this blog post with the purpose of sharing the way that I design my cards, the information provided here is based in my own opinion and creativity. I am not an expert by any means, and I only share the way that I design my cards. Most of the products use on my blog posts are personally purchased by me. However, all products used on today’s blog post by Spellbinders were sent to me. Please, keep in mind, all referral links were added for you to know from where I purchased or received the items from as, all of products shared and mentioned in each of my blog posts are simply because I use, and truly love them.