
Simon Says Stamp October 2019 Card Kit Greeting Cards
Happy everything crafters! Get ready because…on today’s blog I’ll be sharing with you nine cards! Yep…you’ve gotten that right NINE cards that, I’ve created using; elements from the SSS October Card Kit by Simon Says Stamp and more! So… without further ado, grab a cup of coffee or tea and let’s dive into the step by step on how I’ve made them ↓

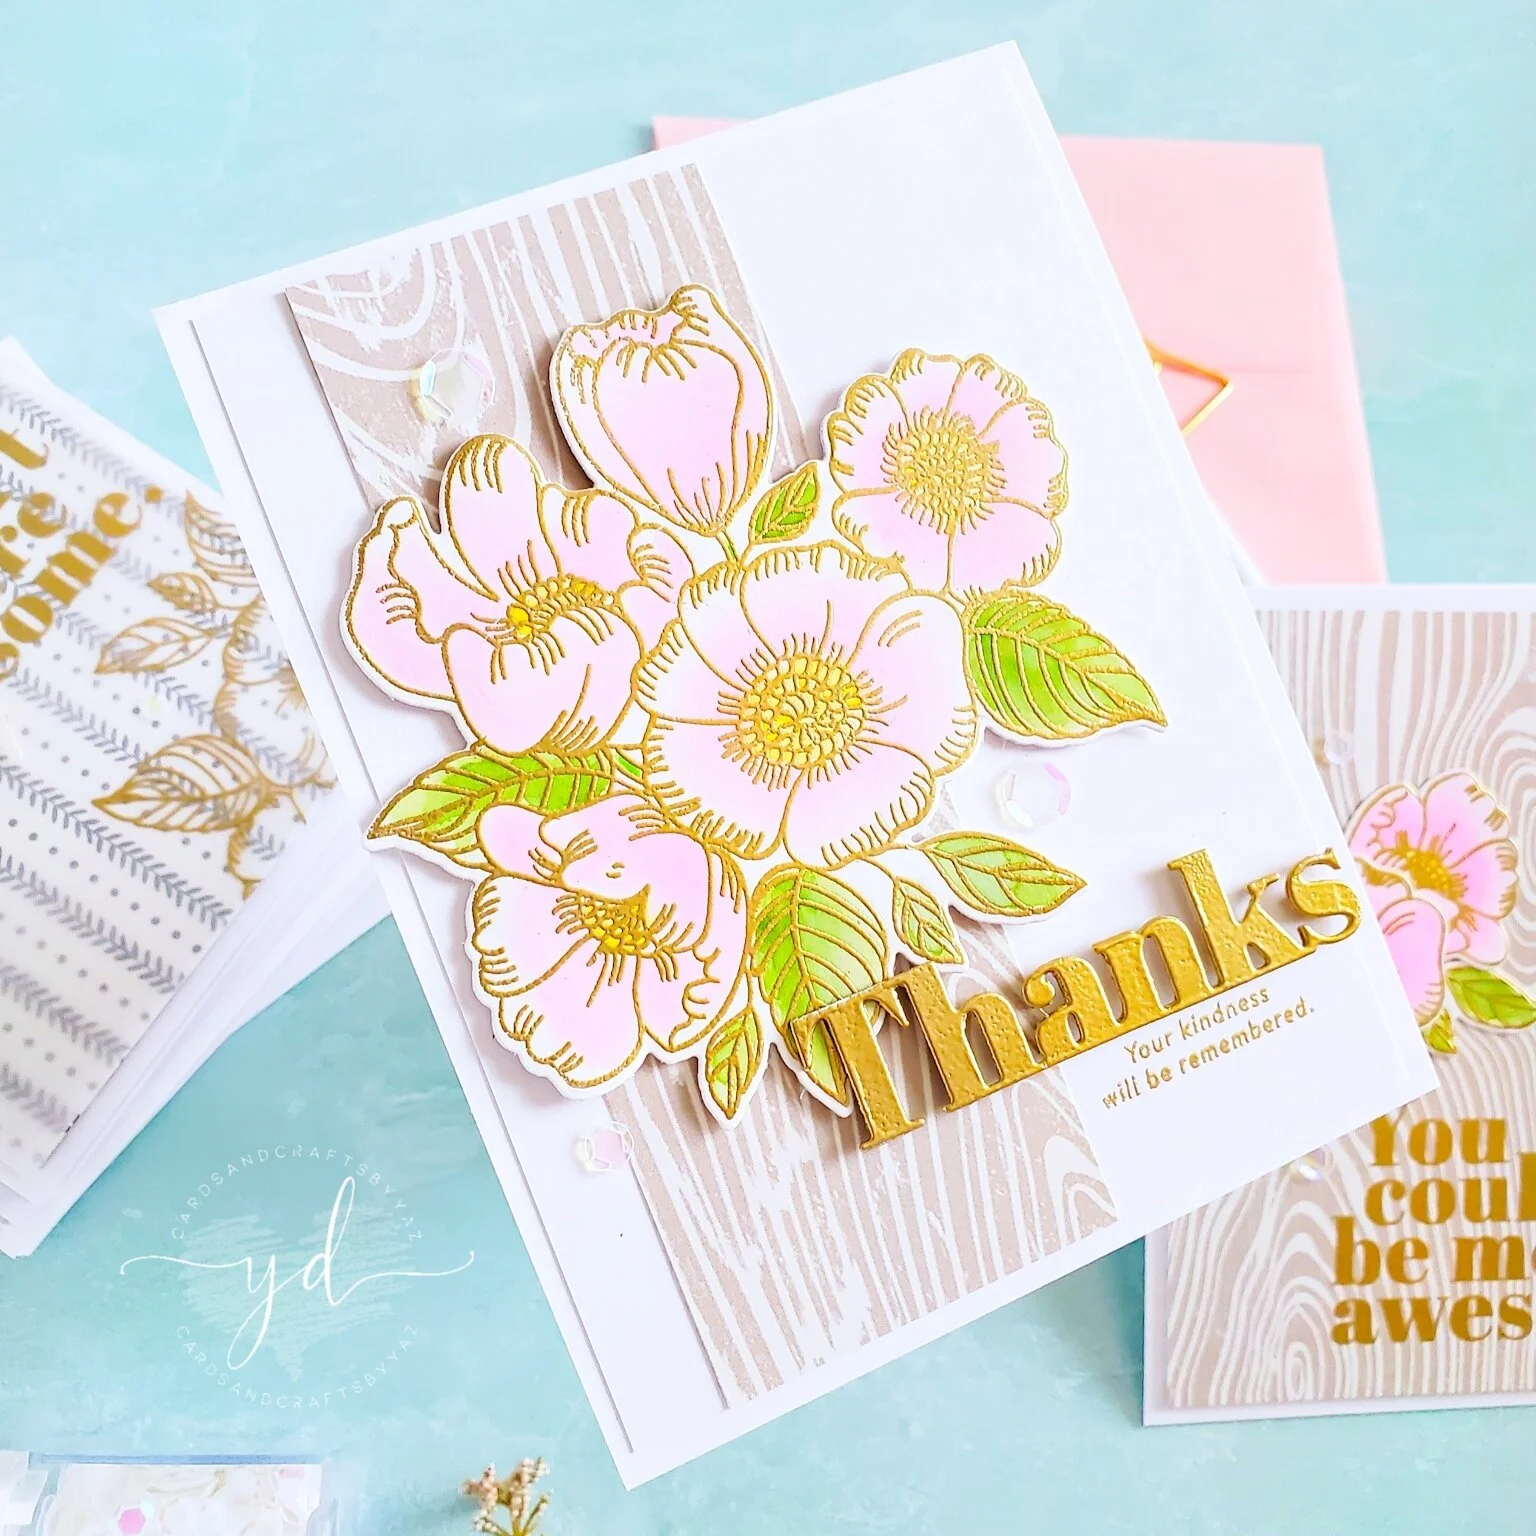
For the fist card, I started by treating a Strathmore Bristol Smooth card panel with the Embossing Powder Tool because, I was going to stamp with Embossing Ink the Flowers from the Thankful Flowers Stamp Set which is by the way included in the kit. Right after the stamping, I covered the images with Metallic Gold Rich Embossing Powder and I heat set it with the Heat Embossing Gun Tool. Once the powder was melted, I water colored the flowers pink hues so, for that I used Fairy Dust Ink Cube Set as well as Over the Hill Ink Cube Set for the leaves. Soon after the water coloring, I set the panel aside to dry. In the meanwhile, I trimmed a card panel out of one of the patterned papers included in the kit a bit smaller than an A2 size card base and I gold heat embossed a sentiment from the stamp set in the lower side of the card panel. Then, I adhered the backing of it to a top folding white card base with thin foam mounting tape. By the time that I was done with the card panel the flowers and leaves were already dry so, I ran through the die-cutting machine the panel and the Thankful Flowers Wafer Dies to die-cut the flowers and leaves out the card stock. As, you can see in the picture above, I created a little flower cluster by adhering some of the flowers and leaves from the die-cuttings above the gold heat embossed sentiment. As a finishing touch, I adhered some of the Pink Moonstone Sequin Mix for a sweet sparkly touch!
For the second card, I adhered the backing of the scrap piece that I’ve left from the previous card panel with double-sided tape to a white card panel which was a bit smaller than the card base. Next, I adhered the backing of the flower cluster from the die-cuttings with foam mounting tape on top of the patterned paper piece which by the way, I had adhered off set as you can see in the picture above. After adhering the flower cluster, I ran through the die-cutting machine the Thanks die included in the kit along with white card stock to die-cut 2X the word Thanks. Once, both die-cutting were done, I adhered one on top of the other with liquid glue because, I wanted the thanks to be sturdy as I was going to gold heat embossing it so, as soon as the heat embossing part was done, I adhered the backing of the die-cutting word to the card with skinny strips of foam mounting tape. Lastly, I decided to gold heat embossing a sub sentiment underneath the Thanks as you can see in the completed card. To finish the card off, I adhered some of the sequins that I used on the previous example here and there for a sparkly touch.

For the third card, I used vellum for a frost look on the card panel. So, first I created an A2 size card panel out of vellum. Next, I treated the vellum panel with Embossing Powder Tool because, I was going to gold heat embossed the flower cluster on two corners of the panel as well as the sentiment so, once the heat embossing was done. I trimmed the vellum panel to H 5.5’’ X W 4.0’’ and I set it aside. In the meanwhile, I trimmed one of the patterned papers a bit smaller than the card base. Because, the vellum was a bit taller than the patterned card panel I was able to fold the 1/4’’ in so, I used the bone folder to fold the vellum and I adhered the fold part the back of the patterned card panel with double sided tape. Then, I wrapped around a few time a big piece of Ivory Burlap String on the top of the card panel and I adhered the backing of it to an A2 top folding white card base. Lastly, I created a bow out of the same string, and I adhered it to the top part of the card. To add a touch of sparkle, I adhered some of the same sequins here and there as you can see in the picture above.

For the fourth card, first… I started by cutting with the paper trimmer four strips out of one of the patterned papers from the kit. To be exact the strips measured W 3/4’’in X H 4.0’’in. Once, I had all four strips cut, I adhered the backing of them to an A2 top folding white card base with foam mounting tape as you can see in the picture above, I left a slightly space in between them. Right after that, I set the card aside while I created the focal point for the card panel. As for the focal point, I ran through the die-cutting machine the Sunflower Stem Wafer Die to cut the shadow layer out of Translucent Vellum this particular die create three cuts so, I ran both together through the die-cutting machine to die-cut them out of white card stock 2X. Once both die-cutting pieces were done, I adhered the backing of both white outer pieces to the vellum die-cutting then, I adhered both inner die-cuttings with liquid glue and, I gold heat embossing the stem and the flower. Right after the heat embossing, I inlaid the inside to the outer part of the die-cutting as you can see in the picture above. Lastly, I adhered the sunflower to the card and I adhered a bow that, I created out of Ivory Burlap String. To finish the card off, I gold heat embossed a sentiment on a piece of white card stock which right afterwards, I trimmed and adhered to a piece of scrap to create a little frame before I adhered it to the lower side of the card with foam mounting tape.

For the fifth card, I ran through the die-cutting machine the Color Block 1 Die and the two leftover pieces from the patterned papers that, I used on the two previous cards. This is actually a different way to use the die as this is meant to go around like when you use color card stock. But, because…I used two different patterned papers I ended up with a chevron pattern by following the lines of the center Black & White lines and dots. So, to create the card panel like I said, I play around with the patterned papers and once I had them the way that I wanted, I adhered each of the backing pieces to fun foam with double-sided tape then, to an A2 top folding white card base creating that way lots of dimension. Lastly, I adhered offset in the first half of the card panel some of the foiled letters which by the way were included in the kit and, to complement the thanks created with the letters, I gold heat embossed a sentiment in a piece of white card stock and I adhered the backing of it to the second half on the card with foam mounting tape to level the dimension from the Thanks.

For the sixth card, I used three of the patterned papers from the kit. So… to begin with, I stared by adhering the scripted patterned paper which, I cut it into a W4.0’’in X H 2.5’’in once it was cut, I adhered the backing of it to an A2 top folding white card base with double-sided tape. Then, I ran through the die-cutting machine pieces of the two floral patterned papers along with one of the dies from the Lacey Edgers 1. Right after when I was done die-cutting the six edges, I adhered the top part of five die-cutting pieces to the card as, for the last one, I decided to wrap around Ivory Burlap String creating that way a soft lace look for the bottom part of the card panel. Lastly, I adhered offset some of the letters included in the kit and to finish it off, I created and adhered a bow with the same string which I finished by adhering a sparkly sequin.

For the seventh card, I used the leftover pieces from the patterned papers from the previous card. So, I cut six rectangles that measures W 1 3/4’’in X H 1 1/2’’in. Once, all rectangles were cut, I adhered the backing of them with fun foam and double-sided tape to a white card panel. As, you can see, I created my own pattern for the card panel by exchanging some of the rectangles. To kept it simple, I white heat embossed on a piece of translucent vellum the floral cluster from the stamp set with Opaque Bright White Embossing Powder which right after the heat embossing, I ran though the die-cutting machine along with its coordinated die. Soon after the die-cutting, I adhered the cluster to the center of the card with liquid glue and to finish the card off, I adhered some of the letters from the set included in the kit. As, a finishing touch, I adhered some of sequins for a sparkly touch.

For the eighth card, I kept it even simpler as all I did was to trim the patterned paper which was also included in the kit and I adhered the backing to it with foam mounting tape to an A2 top folding white card base. By looking at the pattern from this paper, I couldn’t think of anything else than die-cut the Clustered Leaves Outline Die out of white card stock and the Clustered Leaves Die out of translucent vellum. Aren’t those the perfect die-cutting for this pattern paper?? Well, once the die-cutting were cut and adhere to the card the last thing that, I did was to gold heat embossing two sentiments from the stamp set in a piece of white card stock which right afterwards, I trimmed and adhered to the center of the card with foam mounting tape. To finish the card off, I adhered some sequins here and there for a sparkly touch.

Last but certainly not least, I create a shaker card! So… for the ninth card, I ran a white card panel along with the Oh Happy Day Shaker Dies to cut and stitch the frame out the white card panel. Next, I gold heat embossed one of the sentiments from the stamp set included in the kit on Acetate. Once the heat embossing was done, I adhered the frame on top of the acetate with strong double-sided tape and, right after that, I adhered skinny strips of foam mounting tape to the backing of the frame and I set the frame aside. In the meanwhile, I trimmed a patterned paper the same size as the card base and I adhered the backing of with double-sided tape to an A2 top folding white card base. Lastly, I put upside down the frame, and I added a large amount of crystals soon after that, I peel off the backing of the foam mounting tape paper and I adhered the front of the card to it. I hope this is not confusing for you! With that being said, that’s ALL I have for today’s blog post LOL. I know it was a lot but, I hope that, these cards inspire you to give these designs a try! As always, I appreciate the time you take to read my blog posts. Below; you’ll find the supply list for the products used in this blog post.
NOTE: I really admire to those that, create 10 cards out one kit! Although, I didn't make it to the 10 mark, I really had fun creating every single one.
Thank you and happy crafting, your time is valuable.
Don't forget to keep spreading kindness, Today and Always.
Best,
Yasmin
Supply List
SSS October Card Kit
Thankful Flowers Wafer Dies
Thankful Flowers Stamp Set
Clustered Leaves Outline Die
Clustered Leaves Die
Sunflower Stem Wafer Die
Acetate
Strathmore Bristol Smooth
Fairy Dust Ink Cube Set
Over the Hill Ink Cube Set
Lacey Edgers 1
Color Block 1 Die
Oh Happy Day Shaker Dies
Translucent Vellum
Ivory Burlap String
White Foam Sheets
Pink Moonstone Sequin Mix
Inkadinkado Embossing Powder Tool
Cougar 110# Heavy Weight Card Stock
Metallic Gold Rich Embossing Powder
Opaque Bright White Embossing Powder
WOW! Embossing Ink Pad
WOW! Embossing Ink Pad Refill
WOW! Heat Embossing Gun Tool
PLEASE NOTE
As part of the WOW! Designer Team, WOW! has provided me a code for all my lovely Subscribers to use. So, don’t forget to take the advantage of a crafty 10% off all purchase for both WOW!
US and UK by simply by using my code: WOWDTYD
Here are the links for both websites weather you’re a US or UK user.
WOW! Embossing Powder US
WOW! Embossing Powder UK

Your imagination is Your limit.
All photography provided by Yasmin Diaz


Creativity is contagious, pass it on.
–Albert Einstein
Disclosure
I am creating this blog post with the purpose of sharing how I design my cards, the information provided here is base in my own opinion and creativity. I am not an expert by any means, and I only share the way that I design my cards. Most of the products used for my blog posts are personally purchased by me. However, I did receive some WOW! Embossing Powder products used for this blog post. Please, keep in mind that, all referral links were added for you to know from where I purchased or received the items from. As, all of products shared and mentioned in each of my blog posts are simply because; I use and truly love them.