
Handmade Greeting Cards Using Patterned Papers
Hi friends, on today’s blog I’ll be sharing with you these four clean & simple cards that I’ve made using two different patterned papers from the 12 single-sided sheets of ModaScraps “Let Your Soul Bloom” Collection, that were included in the Simon Says Stamp May Card Kit. Along with the patterned papers I also will be using the Delicate Flowers stamp set also included in the card kit.
So, without further ado let’s jump into the blog!

For the first example I made a double gate card, so I started by creating the card base from a 11’’X 8.5’’ white card stock sheet. Which, I cut down to H 5.5’’ X W 8.25’’ and I scored at
— 2.1/8’’
— 6.5/8
Leaving the center with an exactly 4.25’’ A2 standard size card base once is folded. Once, the scoring was done I reinforced the folding, and I set it aside. For the patterned paper pieces I trimmed two pieces that measured H 5.25 X W 1 7/8 and I adhered them to each side of the card base. For the center piece I used two sizes of the Oval Infinity Dies to die-cut the bigger oval out of In Green Leaf card stock, and the smaller oval out of white card stock. In the meantime I die-cut out of white card stock the two little branches from the MODERN FLOWERS Wafer Dies Right after the die-cuttings were done, I gold heat embossed one of the sentiments from the Delicate Flowers stamp set in a piece of white card stock, and as soon as I was done melting the embossing I started the layering for the center piece.
So, for the layering I adhered half of the green oval to one of the foldings of the card base with liquid glue. Then, I adhered the entire backed of the white oval with foam mounting tape to the green oval, soon after I adhered the two little branches on one of the sides of the oval. Finally, I adhered the sentiment which I trimmed down with liquid glue to the oval, and to finish the card off I added a touch of gold by tying up a double bow from a big piece of Metallic gold thread.
For the second example I scored, and folded a side folding A2 size white card base. Then, I used a stitching card panel die to die-cut a panel out white card stock. Last but not least I trimmed a bit the patterned paper to a smaller size than the stitched white panel.
For the layering, I adhered the backed of the white stitched panel with liquid glue to the side folding white card base. Then, I adhered the backed of the patterned paper with double sided foam mounting tape to the white stitched panel. In a separated piece of white card stock I gold embossed a sentiment from the same stamp set, and once the heat embossing was melted I used a die from NESTED BANNERS Wafer Dies to cut the sentiment out of the white card stock. Last but not least I decided to add a little foliage to the card, so I used another die from the Modern Flowers die set to die-cut the greenery 2X out of white card stock. Finally, to finish the card off I adhered both foliage with liquid glue, and I adhered them to one of the sides of the card, followed by the sentiment which I adhered on top of it with double sided foam mounting tape. For a touch of gold I repeated the same step as the first example by adhering a tying bow from the same Metallic Gold thread.

Here I’m sharing a picture that I took from the side, for you to see the simplicity of the layering.

And, here I took another for you to capture them side by side.

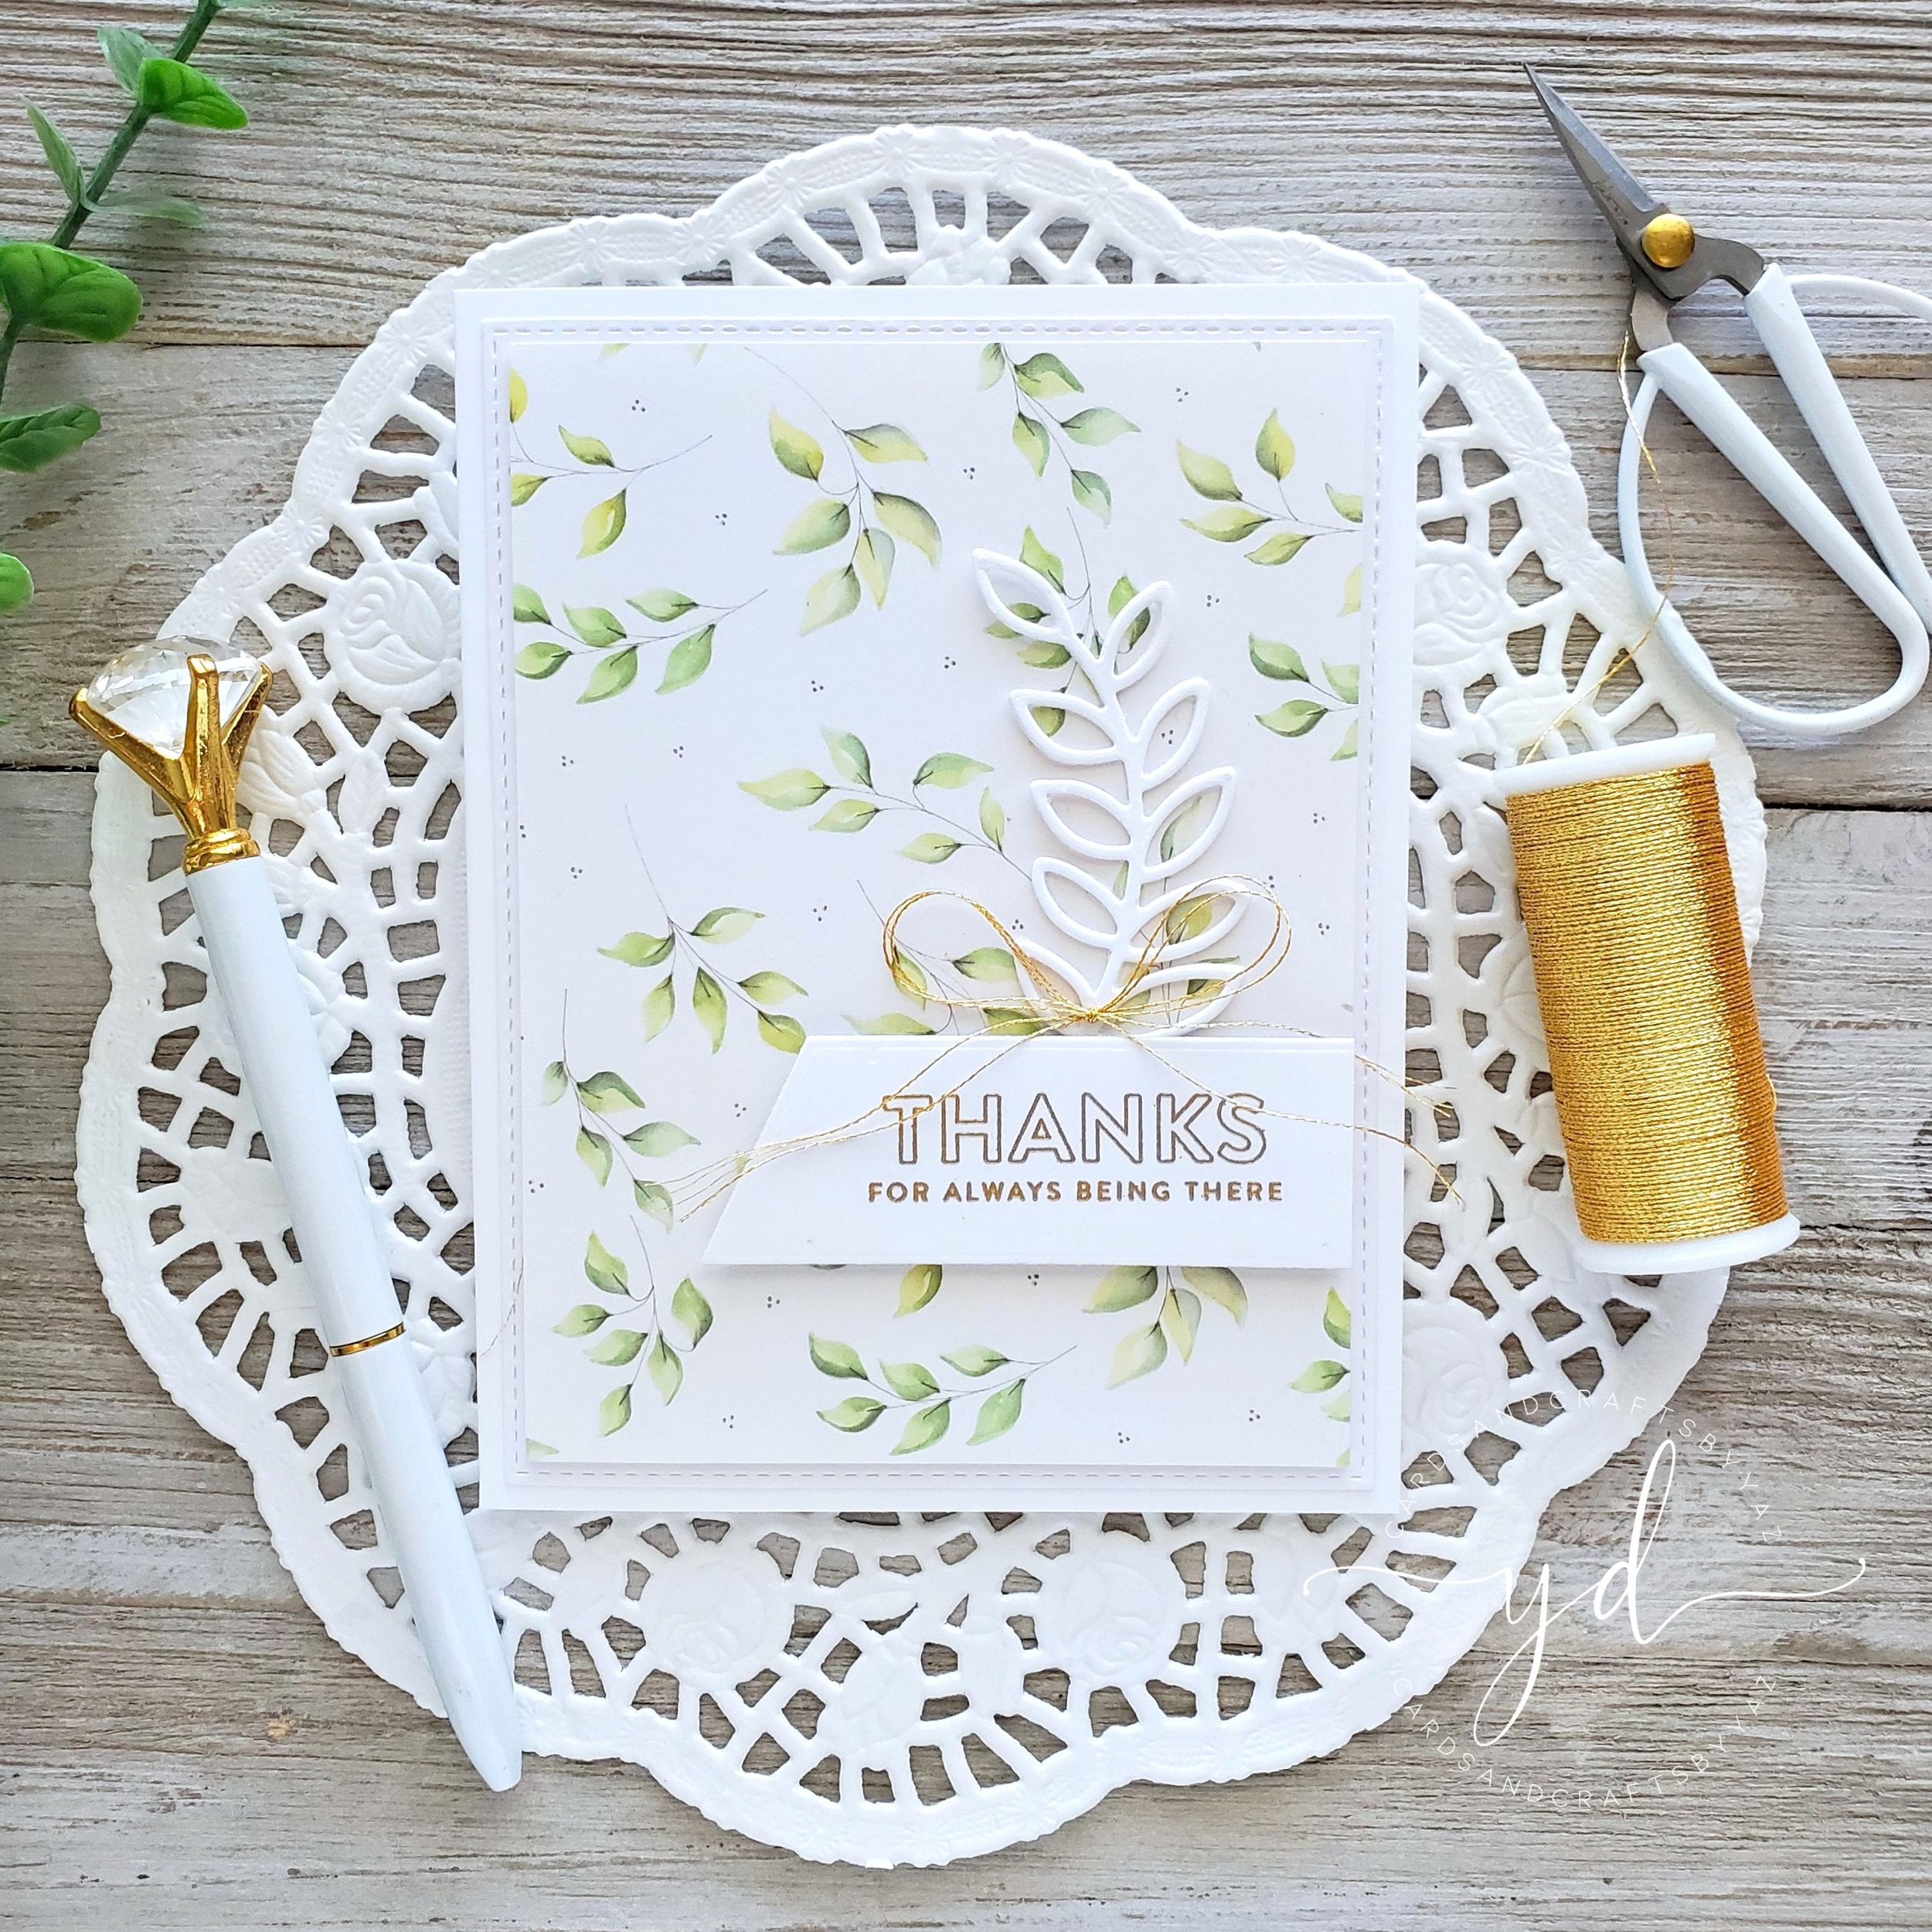
For the third, and fourth example I used the leftover pieces of patterned paper that were left from the two previous cards. So, to begin with I started by prepping the card bases by folding and scoring them. Once, I had the card bases ready I set them aside, and I dry embossed each of the white card panel bu using two different embossing folders. About the embossing folder, all I can say is that one is from Darice company, and the other from Park Lane company. Unfortunately, I don’t have the exact names for them as I didn’t keep their original packaging.
So, moving on after finishing the dry embossing I started the layering for each card panel.

For this card I adhered the backed of one of the dry embossed card panels with liquid glue to the white side folding card base. Followed by one of the leftover pieces of the patterned paper which I adhered with liquid glue to one of the sides of the card. Right after, I gold heat embossed one of the flowers from the stamp set in a piece of white card stock, and I fussy cut it. In the meanwhile, I die-cut out of white card stock the leaves by using David Tutera Die Leaf Once, the die-cutting was done I decided to gold emboss the tips of the leaves as you can see in the picture above. And, once the heat embossing was melted I adhered the leaves to the card with liquid glue. As for the embellishment I used a big piece of Light Silver metallic thread, which I adhered it underneath the flower that I adhered with foam mounting tape to the card. Finally, for the sentiment I used a paper trimmer to cut two sentiments out from the Simon Says Stamp SENTIMENT STRIPS 2 and I adhered them to the card with foam mounting tape. And as a finishing touch I adhered a combination of gold sequins here and there for a sparkly gold look.
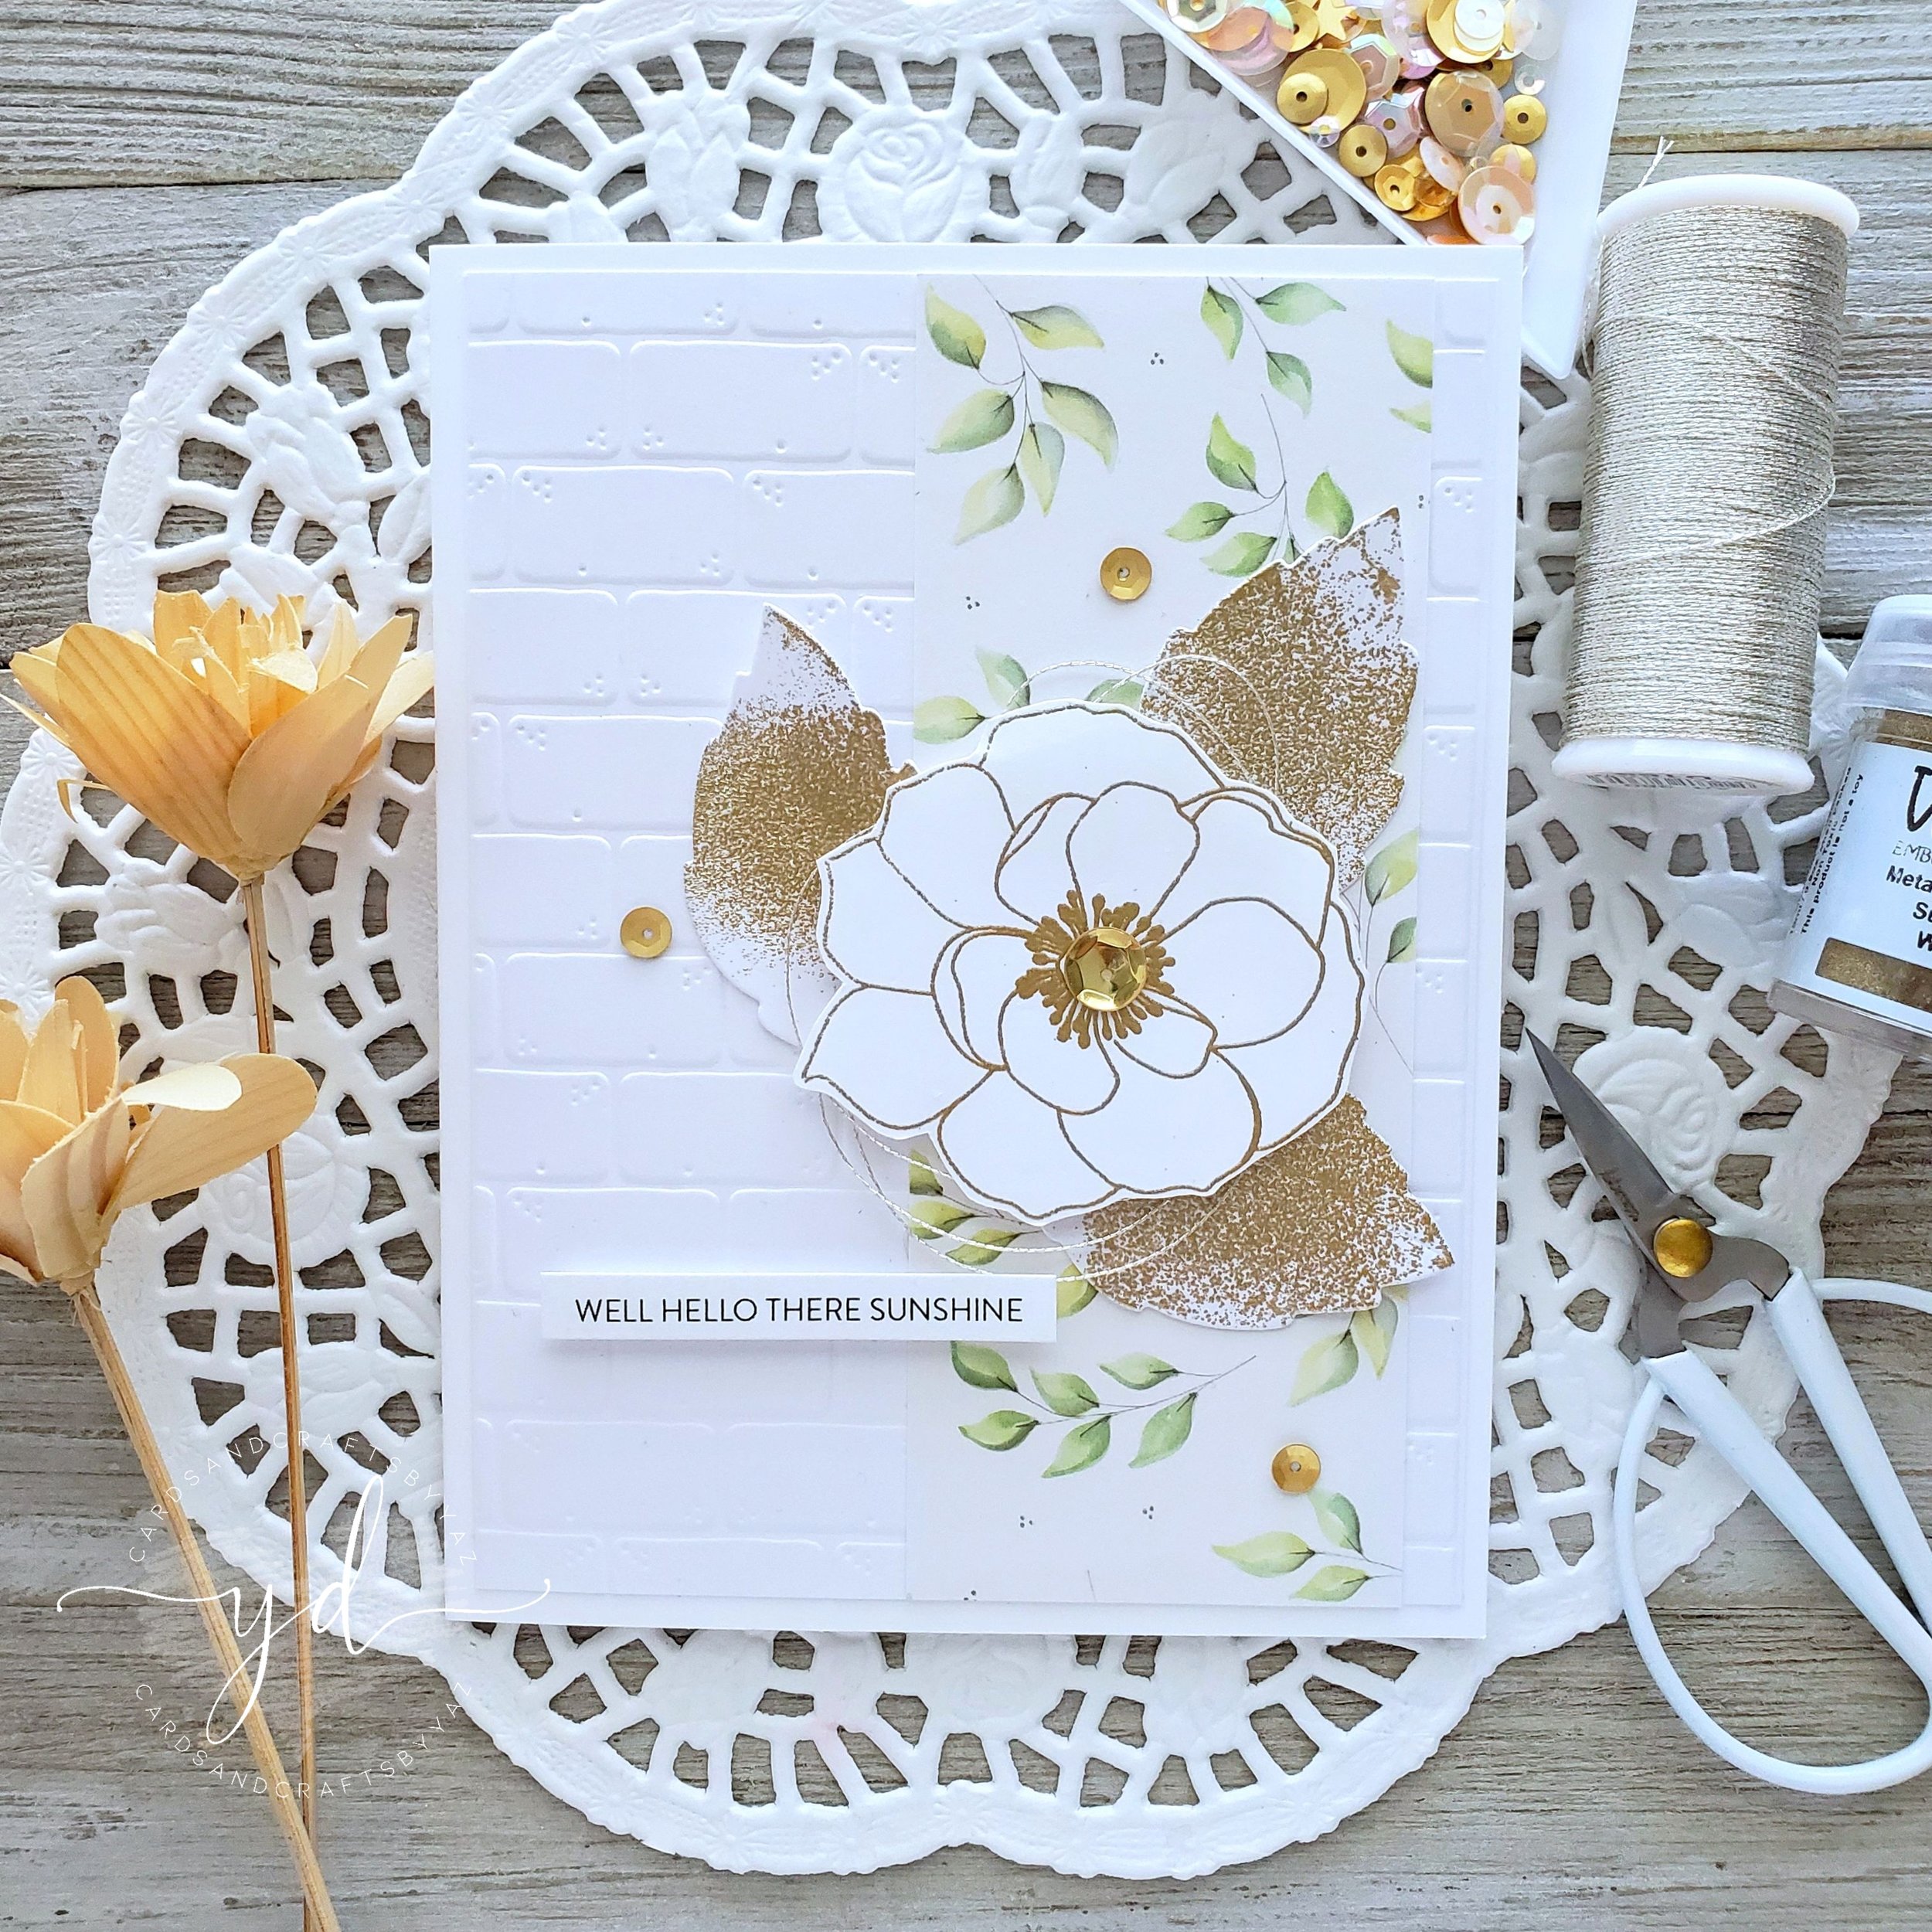
For the last example I adhered the other dry embossed panel to the card base, and I repeated the same steps as the previous example. However, I decided to change the placement as you can see in the picture above to the other side of the card. Also, I cut out a sentiment from the same SENTIMENT STRIPS 2 set. As you can see I also added less embossing powder to the leaves, but overall I kept the same design.
So, that’s all for today, I’m glad if you made it to the end, As always I hope you’ve had a great time here with me, please know that I appreciate the time you take to read the blog posts. Down below you’ll find the supply list for all the products used in this post, as a referral from where they were purchased or received from.
Thank you and happy crafting, your time is valuable.
Don't forget to keep spreading kindness, Today and Always.
Best,
Yasmin
Supply List
Simon Says Stamp May Card Kit
Delicate Flowers Stamp Set
Simon Says Stamp SENTIMENT STRIPS 2
Simon Says Stamp MODERN FLOWERS Wafer Dies
Simon Says Stamps NESTED BANNERS Wafer Dies
Simon Says Stamp Stay Gold Sequins
David Tutera Die Leaf
ModaScrap “Let Your Soul Bloom” paper collection
Lucy's Cards GILDED PEACH Sequins
Oval Infinity Dies
Metallic Light Silver Embroidered Thread
Metallic Gold Rich Embossing Powder
Embossing Ink Pad
WOW! Heat Embossing Gun Tool
Cougar 110# Heavy Weight Card Stock
Neenah Classic Crest #110
Neenah Smooth Solar White #80
PLEASE NOTE
As WOW! Designer Team member, WOW! has provided me a code for all of you my lovely Subscribers. So, please don’t forget to take the advantage of a 10% off all purchase for both WOW! US and UK by simply by using my code: WOWDTYD
‒ Here are the links for both websites weather you’re a US or UK user.
WOW! US
WOW! UK

Your imagination is Your limit.
All photography provided by Yasmin Diaz


Creativity is contagious, pass it on.
–Albert Einstein
Disclosure
I am creating this blog with the purpose of sharing how I design my cards, the information provided here is base in my own opinion and creativity. I am not an expert by any means, and I only share the way that I design my cards. All of the products used for this blog post were personally purchased by me. However, I did receive some of the WOW! products mentioned in this blog post. All of the referral links were added for you to know from where I purchased or received the products from. The products shared, and mentioned in this blog posts are simply because I use, and truly love them.